GENERATOR
1 gallon of gasoline is equivalent in energy content to a lead
acid battery
weighing a mere........2144 pounds.
Brent Covey
[STARTING] [ALTERNATOR
REMOVAL] [OIL PRESSURE SWITCH] [RUBBER MOUNTS]
[HEAD REMOVAL] [MUFFLERS] [ONAN VIDEOS] [Weight] [Other generators] [Dual Fuel]
[220 VOLTS] [Fuel Solenoid] [ELECTRONIC IGNITIONS] [NO WATER]
 To
search for a topic on this page type Ctrl+F and the key word.
To
search for a topic on this page type Ctrl+F and the key word.
How do I get 220 volts
out of my Onan?
"I (actually my chief engineer) split the two coils to provide separate
110 to two separate circuits. Two 110 hots and a ground give you 220 if
needed. In the installation manual for BGE, NHE Gensets Manual
#965-0628 of 2-92 page 7-4 the schematic #611-1206 for 60HZ generator.
He moved:
T4 From L0 to L2
T3 From L1 to L0
CB2 From L1 to L2
This is a totally unauthorized switch and what you do is up to you.
(Marcus McGee)
****************
The onan wasn't rewound, it was re-connected, from paralel to series or
the
other way around. The compound reactor was replaced by an
electronic
regulator. I'm still trying to find the exact schematics. When I have
them I
will tell you all. Marc Hogenboom
Dual Fuel /
Propane Onan Conversion
Here is a Propane conversion
http://www.pggp.com/Onan/
http://www.propanecarbs.com/small_engines.html
And a dual fuel conversion
I posted some pictures of my dual-fuel Onan conversion:
http://www.gmcmhphotos.com/photos/showgallery.php?cat=4970
After replacing the Onan with a Genrac in the GMC I did not have the
heart to scrap it. So it sat around for a while until I decided to make
use of it. So I mounted it to a cart, fixed all of the various problems
it had and set it up for dual fuel operation. So now I have it as an
emergency backup generator. I have used it from my home LP gas supply
and from 20lb gas grill cylinders. I have not had problems with them
freezing but I have not used them in cool weather either.
it is a good idea to re-gap the plugs to .018" if you are primarily
running on Propane or natural gas. It is easier on the ignition system
(lower peak secondary voltage) and still runs OK on gasoline.
I have not attempted to see what happens at full load. I suspect the
output will be less when running on propane because the raw gas takes
up more space in the combustion chamber. So, unless you increase the
compression (so as to take advantage of the higher octane rating of
propane) the horsepower will go down when running on propane.
With regard to gas tank icing there are a number of issues. First I
only tested it on a 20Lb tank while powering a 15K BTU A/C,
refrigerator and some lights. So I am not sure what will happen under
full load.
The other problem is knowing what is in your propane gas tank. The mix
of propane/butane etc. (and thus the vapor pressure at any given
temperature) found in cooking gas varies from region to region. But I
suspect that placing my 20Lb gas tank near the hot air outlet of the
Onan would probably be good enough to keep my gas flowing in a pinch.
I am not sure what will happen if you try to run the Onan from the
vapor outlet of the existing GMC propane tank. Maybe someone else who
has tried this can chime in. The propane heater is rated at 35K btu's
input/hr and the propane hot water heater uses 5K btu's input per hour.
I dont think there is a problem running them both in cold weather from
the onboard propane tank.
I am not sure how much gas the Onan takes while running. One HP is
about 2550 BTU's/Hr. So if the Onan takes the same gas flow as the
heater/water heater then that would be something like 15Hp fuel input
(about 11.5Kw). Not sure what the efficiency of the Onan is. But if we
knew, that could be a starting point for guessing how much load you
could expect to carry from the on-board propane tank.
I used a Garretson model KN regulator:
http://www.propane-generators.com/garretson.htm
These are cheap and very common. Any place that services standby
generators or fork-lifts will probably have them or be able to order
one for you. You must also order a 12v gas valve. Do not attempt this
conversion without installing an electric gas shut-off valve connected
to the fuel pump circuit. You must have the gas turn off automatically
whenever the generator quits running (for safety reasons).
These guys also sell conversion kits for various engines. I am not sure
if they have one for the Onan.
I mostly use the Onan connected to my home propane supply. I am using
flexible 3/4" (maybe 5/8" ?) gas line connected to a shut-off valve on
a 'T' at the output of the secondary regulator (the one on the side of
the house). The few times I have used a portable tank I used a
regulator on the tank with a short gas line connected from the output
of the regulator to the input of the gas valve. The regulator from a
gas grill is too small. Use the larger regulator that is typically used
on trailers and motorhomes (like the OEM one on the GMC).
Usually when I need to use the Onan off-site I just drop the intake
hose (that goes into the gas pump) into a gas can and run it on
gasoline. Much easier than messing with small propane tanks. I do not
remember the longest I ran it on a 20lb tank. I think it was a couple
of hours but I doubt the tank was full when I started. I tried it
mostly out of curiosity. Dave
AND THEN THIS WAY
No gas. Just fire it up. That's why I
duel fuel the Onan. 30
minute run really cleans that carbon out of everything. Makes for sure
and quick starting instead of grinding and waiting on the gas. Then
flip the switch to off, when it stumbles, flip to gas. It's already
there! Conversion is simple.
You just cut and fit the mixer in the flex filter intake. Take only 2
to 3 inches of hose out of the length. Heated regulator, couple of
solenoids, double pole double throw switch, and a line to your old
freeze-em off tank. You know.
You can stuff a hose into your GMC carb and run it off lp. Just crank
it up, cut off the fuel, stuff the hose and when it stumbles, start
feeding the lp. Not too fast or it will flood. Too slow, no go. You
can't touch the accelerator unless your good with your thumbs and can
get used to being a carburetor. I got good at it and field test run
possible old beater engines this way all the time.
Beats a can of gas, old gooey carbs, fuel pumps that won't work, etc.
Just take a vise grip on an old beater, pinch off the fuel line so it
can't get whatever might be in the tank, make sure you got ignition and
fire her up! So many iffy's are instantly eliminated. -Eddie- Houston,
TX
I can' speak for any other 6KW Power
Drawer, but the one I weighed was 382 # + 16# for the bracket + 7 # for
the muffler, making a total of 405 pounds. I used 2
bathroom scales and weighed several times averaging out the small
differences of each weighing, so 405 pounds should be PDC. P. S.
the oil was on the full mark with the fuel bowl empty, the elevation
here is 48 feet and it's PD hot today.
Marsh Wilkes
ONAN
RUBBER MOUNTS (4/17/07)
Due to a request, the replacement motor
mounts for the Onan Genset is available from "M & D Mower" on the
web. The correct part number is "ONA-402-0284". Current price is about
$20.00 and you need four.
http://www.m-and-d.com/ONA-402-0284.html
To check if your motor mounts have collapsed, just put your finger in
the hole in the center of the Onan cover, if you feel a bolt head, your
mounts are good, if you don't, your mounts are bad. Be sure that your
finger is parallel to the ground, without any bend in it. Tom P
How to install by Arch
http://www.gmcmhphotos.com/photos/showgallery.php?cat=4404
ONAN PREVENTIVE
MAINTENANCE
VIDEO
Well at least I know you have your copy of Mr. Onan's video "Onan
Troubleshooting
& Maintenance".
What? You don't? You must not have gone to the Palm Desert Spring
Rally. We gave one free to every attendee. You really need
to go to these rallies.
http://www.gmcmhphotos.com/photos/showgallery.php?cat=3624
But have no fear, the video is available and you can order one for
$12.
Contact Toby Maki at:
tmaki@earthlink.net
You will be amazed at how much you get from watching Duane doing the
preventative maintenance live on video. He has so many hints
during
the presentation that are just not covered in the printed
version.
This is good fun.
ONAN VIDEO FROM THE GMC DEALER TAPES
http://gmcwsproducts.blogspot.com/
MUFFLER SUPPORT BRACKET
FAILURE
This is an item known to fail with catastrophic results. Check
yours today
-------------
her interior and parts of her exterior were cremated as a result of
metal fatigue & failure of the Genset muffler support bracket, this
failure, allowed the muffler to put excess stress on the exhaust pipe,
resulting in its cracking , releasing hot exhaust gases to impinge on
the
fire wall of the generator compartment, unnoticed, because of road
noise
& traffic , the excess heat on the metal firewall, overheated the
wooden
walls on the inner portion of the bedroom of the coach. It appears that
the genset fuel line or filter let go as well, judging by the chimney
effect
on the left rear coach corner post above the gen compartment. ( along
with
the wind from road speed) John
------------
My 74' has the same burn mark on the generator compartment. All I found
was a thin piece of sheet metal screwed to the underside of the
compartment.
Didn't do a whole lot of good. The exhaust manifold's heat
went right through, and burnt the wood nicely!
What I plan on doing, is to use a heat shield material called
FiberFrax,
and line the compartment with it.. It is a ceramic material rated for
2200*
. Neat stuff, took a piece of it and while holding it in my hand, took
a propane torch to it. Never felt any heat through the stuff. Of course
I have the advantage in that I am replacing the compartment and am
planning
on raising the height about 1 inch.
Oh, you can get FibreFrax from Aircraft Spruce:
http://www.aircraftspruce.com
Chuck
----------------------
Electric choke
I had the same problem in 1988.Took the electric choke apart,problem
was the metal part that moved was rusted to pieces.The case and
electric
magnet was fine.Bimetal spring was shot also. Enough of the internal
part
was intact to make a duplicate from a 22 gauge piece of galvanized tin.
The new part was crude but it worked.The electric wire supplies the
electromagnet,which pulles flap and the choke rod while cranking the
engine.A
bimetal spring inside controlls the gradual controll as heat rises.
Think the bimetal spring was eliminated and now the choke goes
completely
open after start button is released.The home made piece has worked very
good for last 14 years.
The valiant choke may provide internal parts that can be used to
hand
remanufacture the Onan electric choke ? Lawrence Gaskins
REPLACEMENT ELECTRIC CHOKE
http://www.gmcmhphotos.com/photos/showgallery.php?cat=3301
this was posted by Jr.
If you look at this GMCPhoto site you will see a drawing of a
bracket
that supports a replacement for the Onan Choke.
Here is the web site.
http://www.gmcmhphotos.com/photos/showphoto.php?photo=3194
Bruce Tara
REPLACEMENT HOUR METER
15000 meter is perfect replacement for the old hour meter.
See, http://www.aircraft-spruce.com/catalog/inpages/hobbs.php
Mike
Is there a cheaper fuel pump for my Onan?
Here is a current pump
http://www.gmcmhphotos.com/photos/gmc-chemicals-and-tools/p48289-onan-fuel-pump-pdf.html
by rob
Part number 73EK9147B, page 23, catalog 62F priced at $34.99
This is a Facet pump, 2-4 PSI output. The picture is identical to the
John Deere fuel pump (for a 105 (gas) combine) I bought for about $45
or
so earlier this year, which is identical to the pump that I didn't buy
at Onan of Indiana for $93 and change. (Mark Grady)
-----------
5 years ago before I knew about the Jims, I replaced my onan 6kw fuel
pump with this identical pump http://www.pegasusautoracing.com/productdetails.asp?RecID=2698
Maximum pressure 1.25-1.75 psi haven't had a problem since and was
exact replacement taking only 5 minutes to swap out. Not sure what
others are selling as no picture, the price has risen substantially as
I think I paid something like $65 back then. (4.9.10) John Blankenship
Onan
/ Propane Door Lifts
I was uncomfortable with the doors hitting the lifting cylinder
brackets
in the original article
http://www.bdub.net/doorlifts/
So in true GMC tradition, I changed the bottom brackets on mine.
http://www.gmcmhphotos.com/photos/showgallery.php?cat=3837
Part numbers from http://www.mcmastercarr.com
Ball mounting , 90 deg angle inverted ball
bracket
9512k95
Ball mounting, 10 mm ball stud w/5/16-18 male
thread
9512k73
gene
23 ft GMC Door Lifts (230 by KenH
http://www.gmcmhphotos.com/photos/showgallery.php?cat=3118
When I bought some door lifts from Gasco in Florida about 10 years
ago,
they came with some directions on how to reinforce the door so the
hinges
did not crack the doors due to the increased loading from the air
lifts.
Their directions were to drill out the pop rivets for the hinges and
fill
the cavity adjacent to where the rivets were attached with Bondo (I
used
the fiberglass filled Bondo).
Then, drill through the original holes for the hinges, through
the Bondo and through the second fiberglass webs just below where the
hinges
were attached. The hinges were then reattached using # 10
bolts.
By filling the cavity between the two door webs, the hinge mounting is
probably more
than three times stronger then the original configuration. Chuck
Governor Adjustments and more bad connections
On the trip to Palm Desert, my Onan was not putting out much voltage
when a load was applied. When I had the water heater and the coffee pot
going at the same time (under 3000 watts) the voltage would drop to
about
100v. I tried adjusting the carb, the governor speed and sensitivity
and
got the voltage to finally hold at 110v with this load. However, I
didn't
go back and check the no load voltage. Unfortunately, I later
discovered
that my no load voltage was in excess of 150 volts (thats as high as my
plug in voltmeter would display) and the result was that I fried my
Statpower
charger when I started up the Onan the next morning.
The manual shows that if a high low voltage occurs when there is no
load at 1800 rpm but the loaded condition has the proper voltage it is
probably a bad "compounding reactor". So, I started working on the Onan
with this as the premise. I quickly discovered that I would have to
remove
the whole brush end of the Onan to get at this part so I decided to see
if I could test it while in place.
It has a lead going to the bridge rectifier which is easy to get at
by just pulling off the plastic cover under the lower rear part of the
brush housing. While under the Onan I accidentally discovered that
another
lead going to the rectifier was very loose at a connection and would
not
hold together. There are two male/female spade connectors going from
the
field windings to the + and - terminals of the rectifier. Each set is
in
its own approximately 2" plastic insulating tube. They are made of
brass
and I found that there was very poor contact as the brass female
connector
had lost its tension. I attempted to squeeze it with some needle nose
pliers
and it immediately cracked. I then soldered in a new steel female
connector,
coated it with dielectric grease and plugged in back to the male
connector
in the tube. I checked the other connector and found that it also was
making
very poor connection and was also loose in the tube. I replaced that
connector
as well.
Governor
I next started the Onan and found that I had much higher voltage than
before. I used a mechanical tach through the front flywheel cover hole
and set the no load to 1800 rpm which corresponds exactly to 126 volts.
I went through the various adjustments with the carb, the governor
speed
and the sensitivity and was able to get 126 volts at no load but it
would
still drop to about 110 with 3000 watts. That's about where is used to
be and I figured that I would have to live with that and just turn the
water heater off when I wanted to use the microwave as we had been
doing
for the last few years. I then noticed the paragraph in the maintenance
manual about the linkage adjustment (from the carb throttle to the ball
on the governor arm). I had never adjusted that so I decided to check
it.
Following the instructions, with the Onan off, I popped it off the ball
joint and held the carb wide open against its stop and checked the end
against the ball joint. I found the linkage to be about 1/4" too long.
I rotated the end until it just fit over the ball stud. I then
restarted
the Onan and readjusted the carb and governor until I again had 126
volts
at no load. I then started to turn on electrical equipment and found
that
the voltage never dropped below 120 volts. I started with the water
heater,
added the coffee pot, the air conditioner heat strip and even the
microwave
and it would still hold at 120 volts. I calculate that I had about a
full
load of 6000 watts on the Onan. It has never done this before in the
20+
years that I've had the GMC.
I had never thought to adjust the linkage arm before. In fact, the
factory
paint was still on the threads when I turned the end to shorten it. It
apparently had never been set properly by the factory.
I also noticed that there are two more of the connectors in the same
type sleeves on the left top of the Onan in the wires going to the fuel
pump and to the solenoid. I checked these but they were tight.
Apparently
the heat from the engine and generator caused the lower brass field
wire
connectors to loose their temper and thus cause a loose connection.
I would suggest that everyone check these two connectors and the carb
linkage on their Onan. There was nothing wrong with the compounding
reactor.
I believe that my initial problem was occurring because of intermittent
contact on the field windings.
Emery Stora
Generator
/ Propane Door Lifts
Onan Carburetor
Although Onan carburetors are no longer available the company that made
them can factory rebuild them and offer parts. The contact is:
Luis
Salis, Walbro Corp., Carburetor Div., 6242 Garfield, Cass City Michigan
48726 and they can be reached at 989-8722-2131.
(4-19-06)
I talked to Luis Salis this morning;
and he confirmed that is company will still rebuild the old Onan
carburetors.
(a) The
carburetor should be sent along with a check for $45 to the company
address, attention Luis Salis.
(b) The check
should be made to: Walbro Engine Management / Luis Salis
Robert Musgrove
REBUILD KIT
My friendly, but expensive, Onan repair depot found a dealer that
supplies
a rebuild kit for Onan 6500 NH carburetors.
Source: V.E. Petersen Co.
Phone: 800-537-6212
Kit Number: K1LMB
Cost: $7.85
Craig
Onan carb float bowl gasket no longer available by GM number or Onan
--
Briggs & Stratton 281165S.
(This is a unique square crossection round gasket that fits into a
narrow groove in the carb). This one
was a dead ringer for my 6 KW.Sorry I don't know who provided this
# Marlene
4K Onan circuit Breakers
Your friend probably has an Emerald Plus model which has two circuits
and two
circuit breakers located on the back of the generator. One circuit
is a
heavier circuit than the other. Reset both by reaching to the back
and
pressing on the breaker buttons. The load each will sustain depends
on how it
was wired in when installed. I have a 6.5 Emerald Plus and that's
the way
mine is. If I run the rear A/C and the water heater comes on, it pops
the
circuit, but I can run the front A/C and anything else in the coach
with no
problem. Hope this is the answer.Andy M,
Circuit Breaker keeps popping
Onan selected a very marginal CB design for some of the Onans.
The type with a reset button is JUNK. If that is what you
have,
replace with an industrial grade CB that will serve you well.
Even
if you have the standard toggle type, now may be time to replace it
also.
Find an Electric supply shop & request a "Quick Lug" type CB &
adapt it into your OEM Onan CB box. The "Quick Lug" type CB has a
lug for input & a lug for output. Cost about $10 & will
outlive
the coach. For a 4 KW use a 40 amp CB, For 6 KW, use a 50
amp
CB for Onan protection. Duane
Wakening a Sleeping Giant (Onan)
For an Onan that has set for several years w/o operation, I would do
the
following after changing the Oil, Oil Filter & Air Filter: NOTE:
DISABLE
ONAN POWER FROM ENTERING THE COACH POWER SYSTEM UNTIL VOLTAGE IS SET
AT PROPER LEVEL.
1) Remove the cover over the control board & spray all
board
& wire terminals with an Electrical Cleaner (2-26 at home center,
electrical
dept.). Spray all Onan wire terminals in sight. Wait for cleaner
to work, about 1 hour (WD 40 can be used, but not as good.
2) Remove carburetor to Fuel pump hose. File off brass
crimp
sleeve & find barb fitting. Replace w/fuel hose (3/16" I
Think).
3) Remove Carburetor & clean (Existing gaskets should be
OK
to reuse).
4) Clean all Onan Battery cables, both ends.
5) Now that the cleaner has had time to work, it is time to
evaluate
if you fuel system is functional. Jumper board terminal 9
to
5 & you should hear fuel pump & see fuel coming from
pump.
Got to achieve this step before anything else (Need Fuel to function).
6) For test purpose, remove the following wires from the
Control
Board: All wires on upper board terminals & terminal 12.
7) Reassemble fuel line & carburetor & jumper board
terminal
9 to 5 & let pump operate for a few seconds. Hit the start
button
& she should run.
8) Adjust carburetor Hi speed jet (lower side of bowl) for
smooth
running. Monitor the Onan output voltage & adjust the
Governor
shaft nut for 125 to 125 V AC w/o load.
Now you should be ready to connect Onan Power to coach for
evaluation
under load.
Onan Runs with Jumper in place. My advice is to use terminals
9 to 5 for jumper (not 9 to 11 as book states). 9 to 5 provides a
5 amp fuse protection that 9 to 11 does not. First: comments on No AC
Output:
Lanier's statements is what I would do to determine if the Circuit
Breaker
is faulty, then remove (CAREFULLY note the Bridge rectifier to
connector
base orientation...mark with tape/paint...both items). The
connector
base & BR should have marks for inserting the BR (+ on connector
goes
to + on BR). Via the marks added, verify that the BR was
installed
properly prior to your removal. The BR can be installed 4
different
ways (not mechanically keyed) & only one way will function &
one
way will zap the BR. The BR can be evaluated/tested
with an ohm meter/diode tester function per GMC Manual
instructions.
If you have a bad (verified bad BR) then it is time to replace with an
aftermarket High Voltage BR. The connector base has to be altered
to accept an aftermarket BR, but it is well worth it.
Instructions
latter
for this if needed. If CB or BR does not fix problem, then look
at condition of the Brushes & associated wires. GOOD
LUCK
on AC fix.
Now the Control Circuit (could be the board, but don't jump to early
conclusion): Need to make some measurements & wire removal
first.
What ever you do, don't, again I say don't get hooked into an
aftermarket
Onan Control Board..no documentation on board & therefore no
existing
trouble shooting information...also an Onan shop will not work on your
Onan until the board is replaced with Genuine Board. Also it is
cost
effective for me to restore/repair the OEM Board.
General
Trouble Shooting:
1) Spray the Board terminals with 2-26 Electrical Cleaner (Home
center) & let it soak in.
2) Remove the wires on the board's upper terminals &
terminal
12 (not needed for operation with board stop/start switch)
3) Try to start Onan. If No start, the n monitor DC
voltage
between terminal 10 & 1 and 11 to 1 while cranking Onan
starter.
Must have a minimum of 10.5 V dc (should be more like 11.5 or 12
V).
If not, then charge Battery & clean all Onan Battery cables (Both
ends
of all cables).
Must have 10.5 v dc minimum to proceed.
4) Now probe board fuse & verify 12 v dc is present at
both
ends of fuse holder.
5) Jumper terminal 9 to 5 & you should hear the fuel pump
running.
Hit Start button & Onan should run. Note you have been there
done that.....OK do it again.
6) measure the ac Voltage present between terminals 8 to 11 as
information
only. Should be 28 to 30 V AC.
7) Stop the Onan & remove the wires from the Voltage
regulator
& CAREFULLY tape up the single wire alone. Remove the
other
wire or wires & tape them up while maintaining connection of the
two
wires if so configured (some Onans have only two single wires attached
to VR).
8) Now try to start Onan w/o jumper. If it still want start
then
it is time to remove the wires from the board & mail the board only
for Board Test & repair as necessary: Place in small CARD
BOARD
BOX (no paper sack with bubble wrap) to following:
Self insure to prevent days of delays at my post Office since
they
will require receiver signature ( most time mail comes I am not at home
& it gets sent to main post office for pick up...the other side of
town & 2 to 3 days delay before available) Self insure,
have not lost one yet & I have back up board if needed.
PS: After Onan is functional w/o jumper, replace wire to
terminal
12 & verify operation.
Then replace upper terminal wires & verify operation. HAPPY
ONANING !!!
Hope this helps you get started on Onan restoration
Duane Simmons
Spark plugs - I'm running Champion 844-1 replacement
for
H10C. lanier
Order Onan Parts
The Denver-area dealer, Cummins Rocky Mt., will ship parts UPS.
(800-927-7201)
Or you can call Onan (800-888-6626) and they will put you in touch
with a
dealer closer to you if you are not in this area.Richard
USED PARTS
Alex Sirum GMC has lots and lots of old Onan's cluttering up their
warehouse, give them a call. Phone 863-763-1121 e-mail
Sirum@Okeechobee.com Jim
ONAN
MUFFLERS
The $65 Onan muffler and down pipe
See the complete story at http://teamteets.com/gmc/onan.html
Did it, tested, works for me, looks good too.
Muffler Napa Part number: 22769, $49.55
Napa Elbow: 41000, $5.86
Pipe from Aarow: $10 cash
Clamps: $3.00 Mike Teets
*********************
After a lot of searching I could not find
a shop that could do or have the one and one quarter inch tubing
for the Onan exhaust. One shop told me that he used 1.25 galvanized
conduit from an electrical supply. That is what I used. Heated it
with a torch and bent into the shape I needed. Note. heated
galvanized puts off a poisonous gas. Use proper precautions Monte
*********************
Onan Stainless Muffler
GOLBY's muffler kit. Called Golby and they sell
the stainless muffler and exhaust tube for $156.00.manny
ONAN IGNITION
ONAN POINTS KIT
There is a retrofit point set up that has a cap that comes off the
top to access the points and also has an allen wrench adjuster screw
for
the points. The complete kit goes for a little over $100, used to
be less but you can thank Onan for bumping the cost. It is easy
to
install and man is it easy to adjust. The part # is
160-1303.
I can get them for @ $120. Bounds
ELECTRONIC IGNITIONS
[pertronic] [Onan]
Pertronix.
I got the directions on how to do it from Ken Henderson's and Lawrence
Gaskins' previous postings here.
The postings are long so please go back and look at the following:
1. Ken Burton - Onan Ignition Timing - posted on 8-28-03 at 4:48
2. Here is Ken Henderson's posting to the GMCphoto site:
http://www.gmcmhphotos.com/photos/showgallery.php?cat=3608
3. Here is Lawrence's write up with pictures:
http://www.picturetrail.com/gallery/view?p=999&gid=1344546&uid=649762
I followed Ken's example except I mounted the pickup further
clockwise
around the flywheel and added an extra ground wire. I also set my
timing at
25 degrees BTDC. If you read my posting you will see why I chose
that setting. If you do not like my reasoning then use whatever
is
marked on the
flywheel. ken Burton
4 Here is Rob's pertronic install
http://www.gmcmhphotos.com/photos/showgallery.php?cat=5435
Onan
Electronic Ignition by Chuck Aulgur
Before you start this project, be sure to read the article above to
determine if you need a new baseplate for your Onan. The early
models
need this extra part. I feel the Onan should be running before
your
start this project. Also set the timing as talked about below, so
that after you install the electronic igniton, you will know the Onan
worked
at this timing before. gene
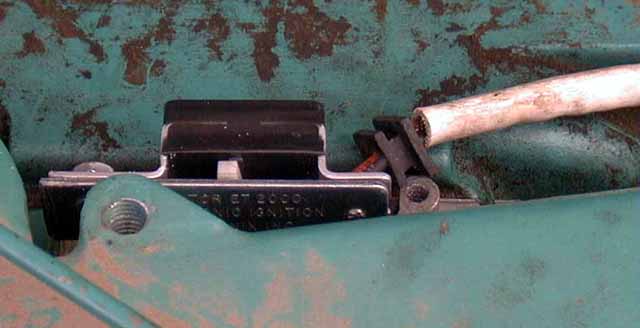
Onan Electronic Ignition by Emery
Stora
photos by Mr.C
The Onan electronic ignition system can be made to fit all Onan
twin-cylinder engines and generator sets built since 1973 with top
adjust
points. This includes all (Model NH) Onan generators installed on
GMCs. It is called Magna Arc, part number 160-1376. I
believe this is the only one they have called Magna Arc. It
contains an ignition module, cover and cover clip, base plate and
gasket. It sells for approximately $120 .
 This
new unit will not fit as is comes out of the package. The main problem
with the new unit is there is insufficient room to make adjustments to
the adjusting screw, so you can cut off both right angle sheet metal
bends
that hold the adjusting screw and discard the adjusting screw, spring
and
washers. It is very easy to do this with one cut.
This
new unit will not fit as is comes out of the package. The main problem
with the new unit is there is insufficient room to make adjustments to
the adjusting screw, so you can cut off both right angle sheet metal
bends
that hold the adjusting screw and discard the adjusting screw, spring
and
washers. It is very easy to do this with one cut.
Hold the unit with the black block toward you and the adjusting
screw
to your right. Loosen the adjustment hold down screw and move the
two metal bracket pieces so that they are lined up even on the left
side.
This will give you enough adjustment slot to time the engine.
Remove the adjusting screw, spring and washers and make a cut with a
hacksaw on the right side just even with the outside of the hold down
washer.
Throw away the two small pieces you cut off. File the cut edges
smooth.
Then remove the points and condenser from the old base plate and
remount
the new parts to the old base plate, using the new base gasket.
The
new components will screw down under the two screws used to hold the
base
plate. You will need to file a few thousands off the
inboard
side of the threaded post protruding up from the base plate to provide
clearance to mount the assembly. If you do not do this,
the
push rod pin will jam in the bracket and not go up and down.
TIMING
Then time the engine using a timing light per the instruction sheet.
Disregard a lot of the timing instructions that come with the new
kit.
They talk about marking the shaft and even removing the cover.
You
don't have to do that with our Onans.
We have a small hole, about 1/2" in dia. on the top inside of the
fan
housing for timing marks. Start the engine by holding the
two
parts of the assembly roughly even and moving them slightly to get the
engine running smoothly. If the engine will not start, make sure
the white magnet bar is moving back and forth when you are cranking the
engine. The push rod might be jammed as described above.
Point your timing light at the hole and there will be a single
timing
mark. Your timing light can hook up to either of the plugs. Both
fire at the same time. Move the bracket by finger adjustment
until the timing mark lines up in the hole. Then tighten the
locknut
on the adjusting back plate when the timing is correct.
The new cover has a grommet that fits over the wires. If you
drill
a hole in the new cover in the same location as the old cover screw
hole
on the top it will fit and you can discard the new cover clip.
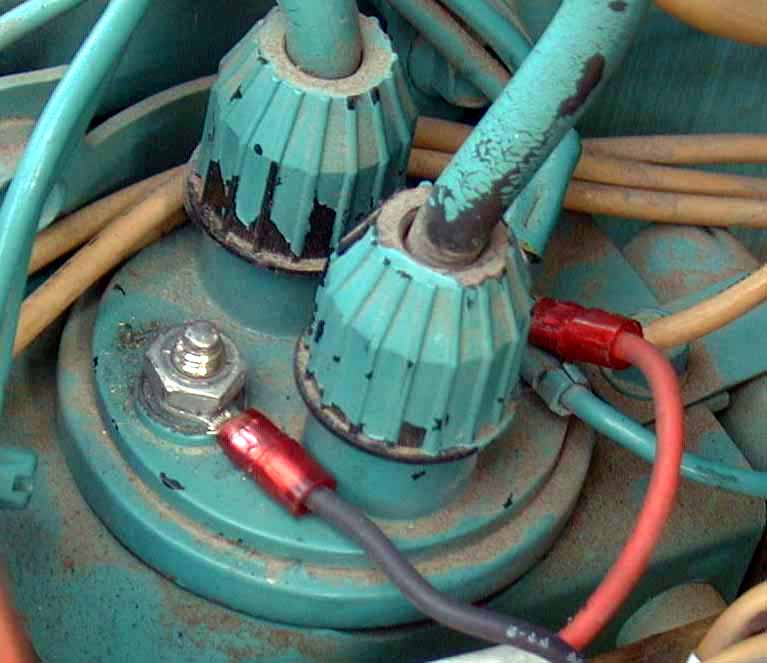
 There
are two wires coming out of the module. The red one goes on
the
hot (+) lead to the coil (the back one on mine). The black
lead
goes to the ground (-) side of the coil. The old points had a push on
connector.
The new black lead has a ring connector so it will be necessary to get
a nut that fits the threaded terminal. The Onan is much easier to
start and performs exceptionally well.
There
are two wires coming out of the module. The red one goes on
the
hot (+) lead to the coil (the back one on mine). The black
lead
goes to the ground (-) side of the coil. The old points had a push on
connector.
The new black lead has a ring connector so it will be necessary to get
a nut that fits the threaded terminal. The Onan is much easier to
start and performs exceptionally well.
Emery Stora
--------------------------------
SETTING THE ONAN FREQUENCY
It is really not necessary to set the Onan frequency. The output
voltage and the frequency are linked inside the Onan and they are not
adjustable
seperately. If you set the unloaded output voltage to
125 to 128 volts the frequency will be correct. If you want to
check
the frequency, the following is a neat trick. gene
----------------------------------
To adjust the frequency (speed) of the Onan you need a 120v ac/dc neon
test light .. available at Home Depot, Lowes, etc. Be sure to obtain a
120v light, some are rated for lower voltages.
A simple setup is to power the coach from the Onan & have an
extension
cord plugged into a commercial power outlet. Put one probe from
the
test light into one of the Onan outlet slots (NOT
the round ground pin). Put the other probe into one of the
commercial
power outlet slots. If the light glows continuously, remove one of the
probes & place it into the adjoining slot of the Onan or commercial
outlet. Do NOT switch both probes. The light should pulsate when
properly
hooked up.
When the Onan frequency (speed) approaches 60 hz, the pulsation will
slow until the Onan freq is exactly 60 hz at which time the light will
extinguish. That is not likely to happen, as the Onan cannot maintain
exactly
60 hz. Therefore, aim for the slowest pulsation. With my Onan, and I
assume
most, 60 hz produces exactly 120v. Obviously, the higher the freq the
higher
the voltage, and vice versa.
Edgar Kremer
---------------------------------
Onan
Oil Pressure
Switch-testing/replace
The GMC Onan oil pressure switch must be a "Normally Closed" type to
function properly with the control board. Take the original
Pressure
switch to you local Auto parts store & they can match it with the
proper
switch arrangement (contact closed w/o pressure... measure it at the
counter).
The Onan Control Board does provide a shut down function when
the Onan is Low on Oil (Oil Pressure) call "Low Oil Pressure" (LOP)
function.
However, one never knows if this function is functional unless a simple
test is accomplished or you "Smoke" your Onan engine. Best to
periodically test this function as follows:
With Onan running, jumper terminal 12 to 1 & the engine should
start to stop in 2 to 5 seconds if the control board is
functional.
If it does not start to stop in the prescribed time or immediately, it
is time forboard repair or don't depend upon this function. Best
to repair !!!
Cost effective board repair (OEM ONAN Boards only) is available from
me as required.
Also, conduct the following test to verify that the Oil Pressure switch
is functional:
Remove the wire from Board terminal 12 & probe the wire end to
chassis
ground & it should be less than 1 to 2 ohms. Now start the
Onan
& the wire to chassis ground resistance should open with oil
pressure
(near infinity reading). If this condition is not verified,
disconnect
the
wire at the Pressure Switch & verify that the wire is not shorted
to chassis ground. If wire is not grounded, it is time to remove the
Pressure
Switch & a trip to local Auto Parts store to get replacement
(Common
part with many auto application). Happy Onaning Duane Simmons
----------------
Here is an after market part number for your Onan oil pressure
switch:
I just installed one and it works fine: NAPA # OP6074. It
replaces
OE on several 80 ish GM vehicles and a 90 ish Geo. Normally
closed.
Opens 3 - 8 psi.(don't have specs on Onan OE). Has the correct
thread.
A funny British thread which looks like metric.Hope this helps.byron
maxwell
----
I found some misinformation posted by Byron Maxwell .
He days a NAPA OP6074 will work and then says it has a "funny British
thread that looks metric". The problem is that the Onan takes a
standard pipe thread,
1/8 - 27 tpi tapered.
The part number from Byron has a straight thread, not tapered. It
would thread in but don't what would happen when it hits the
taper. Emery
---------------
NAPA # OP6282 = Borg Warner # S310
Light Type 3 - 8.3 psi
1/8 x 27 NPT
Chrysler 62 - 78 & 82 - 85
Jeep 55 - 59
Numerous other Chrysler products circa 70s - 80s
Ken
----------------
Onan Oil Filter Replacemets
Any of the following filters will fit the onan. They may not
, however have the built-in bypass that is needed for cold weather
user.
This bypass allows oil to the engine when the oil is too thick to go
through
the filter. The Onan filter cost $7 which is not too
bad.
gene
Fram PH-28A of PH2870, Hasting 134, Lee LP-2131, Mopar -323,
Motorcraft
FL-271, Purolator FCO-252 .
I use the AutoZone Deutsch D484 and Most are under $4. The Onan
filter will cost you.J.R. Wright
I contacted Bosch Co. Technical Service to verify the prior post
that
Bosch filter #3421 contains a by pass valve (desired for Onan
application
since there is none in the Onan Block). Bosch did indeed confirm
the prior report that #3421 does contain a bypass valve in the
filter.
The bypass valve may be viewed by looking into the center hole of the
filter.
The spring mechanism located in the center tube below the threaded back
plate is the bypass valve. Just Though You would like to Know Thanks
for
the prior post Duane
----------------
You may be interested to know that according to the local AutoZone,
the Deutsch
line of filters they carry has been bought out by STP. The
Deutsch
D484 filter
for the Onan is S2870A in the STP line.paul
Onan Runs But No AC (110)
Testing for Flywheel Alternator Voltage
You can see if the Control Board is receiving the Flywheel Alternator
voltage by measuring the AC voltage between Terminals 8 & 11 while
the Onan is running. The AC voltage should be between 28 & 31
volts AC. When the Voltage Regulator fails, it can load down this
signal to less than 20 volts AC & the control Board will not
function.
OBTW the Voltage Regulator is not needed for operation of the Onan
today.
The Onan failure that you have describe is a classic "Bridge
Rectifier"
(BR) failure. However, they typically fail while turning off the
Onan while the AC is running. A voltage transient is generally
the
cause of failure due to the fact that the OEM Bridge rectifiers are
operating
very near to the Peak Inverse Voltage (PIV) rating of the OEM Bridge
rectifier.
A simple solution is to replace the OEM BR with one of much higher
rating.
However, I have not been able to find any aftermarket BR w/the
same
pin-outs. A simple modification to the base (holding device) is capable
to accept the four wires as feed thru(directly attached to the
terminals
of the BR). A 1/4" hole in the base for each wire is all that is
required. To remove the BR, side out the Onan as far as you can &
remove
the BR mounting screw which is located aft of the Control Board on the
rear Generator Housing (1/4" screw head). Remove the plastic
cover
on the side of the generator housing & the BR can be moved to where
you can ID the terminal from the side of the BR.
Carefully...Carefully....Carefully
transfer the terminal ID to each wire (ie. + , - , AC , AC).
Transferring
the proper ID is very important since the Onan will not operate with
crossed
wires & the wires are very hard to trace for ID. Now individually
remove
the wires from the base (relive tab on each wire terminal from the
front/BR
engagement side & push terminals out the rear).
Now
drill 1/4" holes for each wire. Slide the wires thru the proper
hold
& attach/slide on the 4 wires to the BR. Slide the BR &
wire
terminals back down thru the base to where the Original mounting screw
will secure the BR to it's original position on the housing. An after
market
BR w/1,000 volt (PIV) rating is available from many Electronics stores
at less than $10. The PIV is greater than 3 times the OEM BR
&
should never fail (well almost never). NTE # 5328 is the after
market
BR that I use.Duane
Onan Bridge Rectifier
Replacement--
Aftermarket. NTE is an Electronic Packing House that distribute
thru-out
the US at many Electronics Stores (not at Radio Shack). They have
a Bridge Rectifier P/N NTE5328 which works great in our Onan, except
the
Pin Out is different & requires removal of the oem plastic mount
&
individual insertion of the connecting wires. Care must be taken to get
each wire in it's proper place & then attach the Bridge Rectifier
with
it's original mounting screw. The Electrical characteristics of
this
aftermarket Bridge Rectifier is far superior to the OEM (1,000v PRV
&
25 amps). This device should never fail (well almost never) in
our
Onan application.
"Note: Drill 4 each holes into the original plastic mount such
that the individual attached wires have clearance in the mount
for
installation with the original mounting hardware."
-OR THE EASY WAY-
As I mentioned about a week ago, I fried the original bridge
rectifier on my Onan. I'm aware of the connector mod to allow more
readily available rectifiers to be used, but I didn't feel like fooling
with the connector, and when it's 103 outside, you have to make these
jobs as quick as possible. After looking around, I thought I found a
higher capacity rectifier (KBPC3510)with the correct pin outs, but alas
that was too good to be true--their picture was incorrect. However,
when I recieved them (I bought 5 of them for $2.50 each) I noticed that
the pins were necked down as they enter the potting material such that
they are easily twisted to the needed configuration. They have a rating
of 35 amps at 1000 PIV--much more than the originals. It worked like a
champ and made the change a 5 minute job. I also notice that when I
start the Onan, it comes up to voltage almost immediately where it used
to take a couple of seconds--no big deal, but a change. So far so good,
and I now carry a spare which I'll probably never need. Bob de Kruyff
5/18/06
Pictures or the bridge
http://www.gmcmhphotos.com/photos/showgallery.php?cat=3346
From the FAQ at:
http://www.bdub.net/gmc-faq.html
How do I install a new bridge rectifier on my Onan?
To replace the Onan OEM Bridge Rectifier is a 10 minute job. Takes
a little longer to install an after market High Voltage Rated unit
since
the pin out arrangement is different, but it is worth the effort for
piece
of mind. Slide the Onan out as far as it will go & go to the right
rear (behind the control Board) & remove the two black plastic
screens
around the Generator
Housing. Between the two screens is a 1/4" bolt head on the generators
housing. Remove this bolt & the BR will drop down out of the
housing.
Carefully note the pin out orientation before removing the BR. The BR
will
insert 4 different ways.....only one way works....so don't screw up
&
get in a hurry. ( Simmons 6-2-00)
-----------------
DON'T REMOVE THE GENERATOR! Pull out the drawer. Lie
down
under the back side near the control board. Reach up and you'll
see
a plastic screen on the generator housing. I believe that
Gene
Fisher has pictures
on his site. There is one screen on the front side and
one on the rear side. Take out the screw from the center of the
rear
one. Pull out the plastic screen (just a couple of tabs that hold
it in place and it easily pulls out). Reach up into the
hole
and you can pull down the rectifier plug and rectifier. From that
point its just pulling the rectifier and reversing everything to get it
back into place. Emery Stora
------------------------
Water is the worst thing to apply to you Onan.
It is not designed for bathing with water. The maintenance manual
is very clear on this subject. Water creates corrosion on
all
of the Electrical contacts which deteriorate in time & become Big
Time
Problems in the future. Compressed air & a rag works great
when
the Onan gets dirty. Bathing the Onan is like taking
the back off of your Color TV & hosing it down. Damage is
done
!!!!
Onan Control Boarding Testing
You might want to try the following to eliminate the problem:
1) Clean your battery cables (both ends & both + &
- Posts) &
charge battery
2) Disconnect 12 pin connector & clean terminals
w/cleaner
&
re-shape female connectors
to round shape
3) Remove wires (typ 3) from Voltage Regulator &
tape up permanently
4) Remove wire from board terminal 12 for temporary
test
5) Remove all wires from top board terminals for temporary
test
6) If all else fails to clear the problem, mail me
all of your
boards & I
will
test them to see if they are still
functional....minor test &
mailing charge
The items identified above are the most
common
failures that
prevents the control board from
functioning
properly.
"GMC OEM Onan Control Board Total Repair & Restoration
to OEM configuration & Characteristics is available from the
following
GMCer:
Duane M Simmons,
(no longer available)
Repair of your board is cost effective with customer satisfaction
warrantee.
Mail your board for repair & return will occur within a few days
(normally...if
not on long GMC trip). Installation & trouble shooting instructions
are available w/repaired Board."
Air Cleaner Problems
I spent several hours troubleshooting before noticing that the air
intake hose from the air cleaner to the carb was totally collapsing
upon
start-up...the air cleaner was clogged.
Washable/Hi Flow Air Filters are
available
from K&N Company
that fit our Onan Generator set as follows:
mfg:
K&N Company
size:
3 different heights (measure yours to place
order)
4 KW Onan has Air Filter 2" dia. & 7" Height
6 KW Onan has Air Filter 3" dia. & 6" Height
Contact
1-800-851-5334 (Direct Buy-Allison
Enterprisers)
Cost:
Approx. $25
When I changed out the filter on my Onan today I noticed that
the rubber hose (duct) that goes from the filter housing to the carb
was
split. I had never noticed this before as it was split along the
bottom side and not visible from above. I also couldn't find the
Fram replacement filter so I adapted a K&N after finding a
replacement
hose. Click here:
http://www.gmcmhphotos.com/photos/showgallery.php?cat=3182&ppuser=32
to see 3 photos of how easy of a project this is. I used
K&N
P/N RU-0810, and Gates radiator hose 20457.
BTW, the whole project costs less than the OEM air filter from
Onan/Cummings.Steve F.
STARTER
After-market Onan Starter bracket is available from:
APPLIED GMC
http://www.gmcrvparts.com/prod.itml/icOid/812
http://www.ragusarv.com/Pattern
Shop email
ragusashop@earthlink.net
Santa Ana CA
949-261-5898
Cost $49
The Starter Bracket is a highly strengthened Iron Bracket for
heavy duty use in the GMC Motorhome Onan Generator. Have never
heard
of one of Ragusa's brackets failing. Have seen & heard
of many OEM brackets failing. I always start the Onan while
pulled out of its compartment while working on them....thousands
of times. Never had one break !!! Never seen a correlation
of Onan being in Compartment or out of compartment with regard to
bracket
failing. Could it be a coincident with not fixing the problem
that
caused the failure in the first place ?
-------------------
ONAN STARTER MYTH
"Do not start your Onan while it is extended, it will break the
starter
bracket"
John's Onan was doing fine until he extended it and tried to start
it.
Then all H!@#$ broke loose. Being a very observant person, he
found
the bracket had been broken a long time, but the starter was laying on
the mounting tray (polished a nice rub spot) and as a result would
still
operate and start the Onan.
Ergo the myth. Everything seems ok until you extend the Onan
then
the starter falls away and it is obvious the bracket is broken.
The
answer is like all of these things--- good maintenance.
So tomorrow go out and tighten the bolts holding in the starter and
the bracket will probably not break. However if it is broken, go
buy a new stronger one from Ragusa......
John and some others feel that the reason the brackets are breaking
is that the mounting bolts holding the Onan to the rubber mounting
assembly
become loose and allow the weight of the generator to rest on the
starter and bracket. Over time running the Onan and bouncing down
the road, the bracket breaks. The real answer is to check all the
mounting bolts and the bolts through the rubber mounts, they are
usually
loose. Sometimes one or more of the 4 rubber mounts might be
missing
and need to be replaced.
New rubber mounts
APPLIED GMC
http://www.gmcrvparts.com/prod.itml/icOid/1452
http://gmcmotorhome.info/generator.html#MOUNT
Thanks John Bush.
gene
-------------------------
Onan Replacement Starter Information
$205 is the cost of a new Starter,not rebuilt, at my local Onan
supply.
Local shops can also rebuilt your starter at about $150. Best buy
is a new starter which has a new clutch assembly which is not included
w/rebuilt unit.
The original GMC Onan starter (p/n191-1052) has been obsoleted w/o a
replacement cross reference. However, if you give Onan
p/n191-1949-03
they most likely will have one in stock ($205) since it is used on
several
later model Onans. Onan P/N 191-1949-03 will fit 6 & 4 KW
units.
Be sure to check the mounting surface for possible interference.
A slight file or grind may be required for proper fit. The
Original
starter P/N has been obsoleted & may not have a replacement noted
so
don't lose this number.
Also,http://www.ragusarv.com/
Patterns in Santa Ana California has a high strength steel replacement
Onan Starter bracket for about $35. This bracket will not
interfere
with the replacement Starter & will never break (well almost
never)
About 1/3 cost at Onan.. It is a directly replacement starter
that
may have a slight metal boss interference with the OEM starter
bracket.
A slight file job on the bracket or starter will clear this mechanical
interference & function for many trouble free years. .Duane
No Start/stop From Remote - Remote start
connector
problems (3/8/6)
The problem was corroded connector at rear of gen compartment.
This
can be seen when gen pulled all the way out on slides. Clean or replace
connector. These wires go to the inside remote start and hour meter.
MARK
I think you will find that the Remote Control Panel is connected to
theControl Board at the top of the board on some early GMCs & does
not routethese wires thru the 12 pin connector. You will find
that all GMCs have a 4 pin connector in the rear/on the floor of the
Onan Compartment........the classical problem with open remote
control circuits. Just hard wire the connection/eliminate the 4
pin connector for reliable service. Use crimp type Butt
Connectors & tape over the final wire bundle for minimizing future
water contamination. Duane
Go here to see how to ID the connector 3/19/05 gene
http://www.gmcmhphotos.com/photos/showphoto.php?photo=11111
---------------------
In my '78 26ft model, the connector behind microwave oven on the left
side of GMC was disconnected, Mike.
-----------------------
Onan Battery Charger
/Alternator - REMOVAL
Click on pictures for larger view
Absolutely no problem disconnecting the Voltage Regulator (Charger)
on the Onan.
The Flywheel Alternator is the source of voltage that is used by the
Voltage Regulator to provide a small output for charging an Onan
dedicated
(Early GMCs had small Motor Cycle type battery for starting the Onan
&
were charged only by the Onan Voltage Regulator). GM quickly
recognized that House Battery could located near the Onan & serve
dual purposes. However., the Voltage regulator was never removed
from the Onan (no longer required since the Dual purpose battery was
charge
by the Engine alternator while driving & by the AC to DC converter
when shore power is available).
The Flywheel Alternator is required as a feedback signal to the Onan
Control Board to identify that the Onan is running & the starter is
automatically disonnected. Also for shut down function to
remove
Ignition power. Do yourself a favor & disconnect the wires
going
to the Onan Voltage Regulator (Charger) for the purpose of better
control
on the Onan Control Board. The AC voltage going to the Voltage
Regulator
is also used by the control board to tell when the Onan is
running.
A faulty Voltage Regulator can & does load down the voltage to the
point that the control board will not function properly for operation
of
the Onan. I found this out several years ago when my Onan would
not
start in cold weather. Disconnected the wires at the voltage
regulator
& all is well. The AC voltage between Terminal 8 & 11
should
be 30 +/- 2 volts AC. When it drops below 26 volts you are headed
for Onan Run Problems.
 Remove
the wires
Remove
the wires 
I have repaired many Onans control problems by disconnecting the wires
(typically 3 wires) going to the Voltage Regulator (faulty VR that are
loading down the Flywheel Alternator output voltage). All Onans
are
not wired identical, however, most have 3 wires attached to the
VR.
One is by itself & 2 are common on 1 VR terminal. After
removing
the wires, tape up the single wire by itself & keep the two wires
together
& tape them up if so configured. (typically 2
wires
together on one terminal). We should all remove the VR wires as
preventative
maintenance !!! Duane
Onan oil leaks
First thing to do regarding the oil leak is to take off the "S" shaped
crankcase vent hose that is near the carb and check it. I had oil
coming out all over and paid for several unsuccessful attempts by Onan
people to solve the problem. Turned out this hose had collapsed
INTERNALLY
and was causing back pressure to build up in the crankcase. A new
hose, and no oil leaks. May not be your problem, but check it out
and hope it is because that is a quick cheap fix. Justin
If your leak looks to be just forward of the starter, the problem is
likely to be the oil filter bracket. Remove the air shield around
the oil filter and you will be able to reach the two bolts that hold
this
bracket. You can tighten them with a small ratchet and a long
extension.
The bolts work loose over time.
Eliminate Onan K-4 Fuel Solenoid
Don't know why anyone would replace/install the Onan K-4
Solenoid.
Many Onans came w/o the Fuel Solenoid from the factory. The ones
that have a Fuel Solenoid do not gain anything due to the location Onan
selected. It could do some good if it was installed near the
source
of fuel not at the using end. Why not remove solenoid & tape
up the wires & be on your mary way. While you are at
the
fuel line in the Onan be sure that it is of quality & not ready to
break. The solenoid will not help if the fuel line breaks &
out
goes a tank of gas. I prefer a good quality Fuel Hose, not a
plastic
hose as the OEM.Duane
Onan Control Board Test Data by Mike
[INDEX] | [SUGGESTIONS]