TRANSMISSION
[QUARTER MILE] [Gasket and
Filter] [DIP STICK]
Caspro
Transmission Shift Kit
Ragusa Tranny
Pan and Rockwell at applied
GMC PERFORMANCE IN THE QUARTER MILE
Last night the car club I belong to, the Rochester Street Rods (http://www.rochesterstreetrods.com/
go to member pages Bill Gagnier) began it's drag racing season against
The Good Old Boys & The Rochester Street Machines. We race at
Empire
Raceway, a 1/4 mile track south of Rochester
where we race on the third Wednesday each summer month with the winning
club keeping the trophy & bragging rights over the winter. I won't
bore you with details but just tell you how my 1975 GMC Palm Beach did.
The track record for Motor homes was 55 mph. We run on a .500 tree.
1st run reaction time
1.078
ET 23.523 MPH 58.48
2nd
"
" "
.641
" 23.526
"
58.21
3rd
"
"
"
.575 "
23.527
" 58.57
Dial 23.51
"
" .482 "
23.529
"
58.02
a little to eager, red light
I was shocked to have 4 runs with in 6 thousands of
second.
I should have beat everyone but trying to cut a better light I red
lighted.
bill
DIP STICK CALIBRATION
To be sure of the correct fluid level in the tranny, the dipstick needs
to be calibrated to the tranny. There are some variations of the OEM
sticks
& tubes for the 425 tranny, and calibration is even more important
when the front access sticks & tubes have been installed. I have
seen
as much as a 2
quart error on some of the front access tubes & sticks. Also, check
to see that the cap on the dipstick has not moved from where it was
anchored
to the stick.
REMOVING THE PAN
To calibrate the stick with the tranny, remove the sump pan and put
a straight edge across the bottom of the tranny body (where the pan
bolts
on to.) Put a temporary mark at this level, pull the stick out and
measure
DOWN from this temporary mark 1/4", and put some type of permanent mark
there. This will be the HOT/FULL mark for the tranny fluid, under
normal
driving conditions. You can also mark the stick for the ADD mark, that
will be 1/2" below the HOT/FULL mark that you have just marked. You can
center punch a mark there, mark it with a die grinder or drill a small
hole in the stick for your reference mark.
*************
WITHOUT REMOVING THE PAN
An easy way to calibrate the dip stick with out removing the
pan
is :
Take the GMC out for a drive to get the oil hot and the torque
converter full of oil
remove the vacuum modulator and fill the tranny until the oil just
drips out of the hole from the vacuum modulator
now mark your dip stick at the full line. info from ManyT
**************
Fluid levels will be higher than this mark during long, hard pulls,
and this mark will allow for the fluid expansion. You will never ruin a
tranny by running it a pint or even a quart low on fluid, but
overfilling
it will cause big problems, as the fluid gets up into the clutch &
gear packs.
The dipstick tube is part of the vent system for the tranny, so on
the
front access tubes, they MUST NOT be sealed off with the new type
expanding
seal dipstick. One way to vent this would be to braze a small,
goose-neck
tube onto the top-side of the dipstick tube, down from the stick seal,
to make a weather proof vent. Happy GMCing......Bob D
TRANSMISSION GOVERNOR GEAR
Lets say your having a great day driving along in your GMC and you
look at
your speedometer needle and its setting on '0'' you think the speed
cable is
broken. The first time you slow down you find the transmission will
not shift
out of first gear! Don't panic! or call a wrecker, or a transmission
shop.
All you need is a little plastic nylon type gear called a governor
gear.
You can change it yourself with even getting under your coach.
I know of a few
GMC'er that have spent a few hundred instead of ten. I
suggest that every GMC
owner keep a gear kit and a one-eight drill bit in the glove box.you
can order a
gear from your local transmission shop.and hope you will never need
it.
also you can read more about this with photos on page 15 of
motorhome-marketplace
February 1999.
If you would like to have one you can call:
Ray Curtis at Eaton GMC at 1-800-764-3673 he will send a kit for
9.95
inc postage with instructions.
Or Applied at
http://www.gmcrvparts.com/level.itml/icOid/482
Jim Anstett Loveland Colorado.
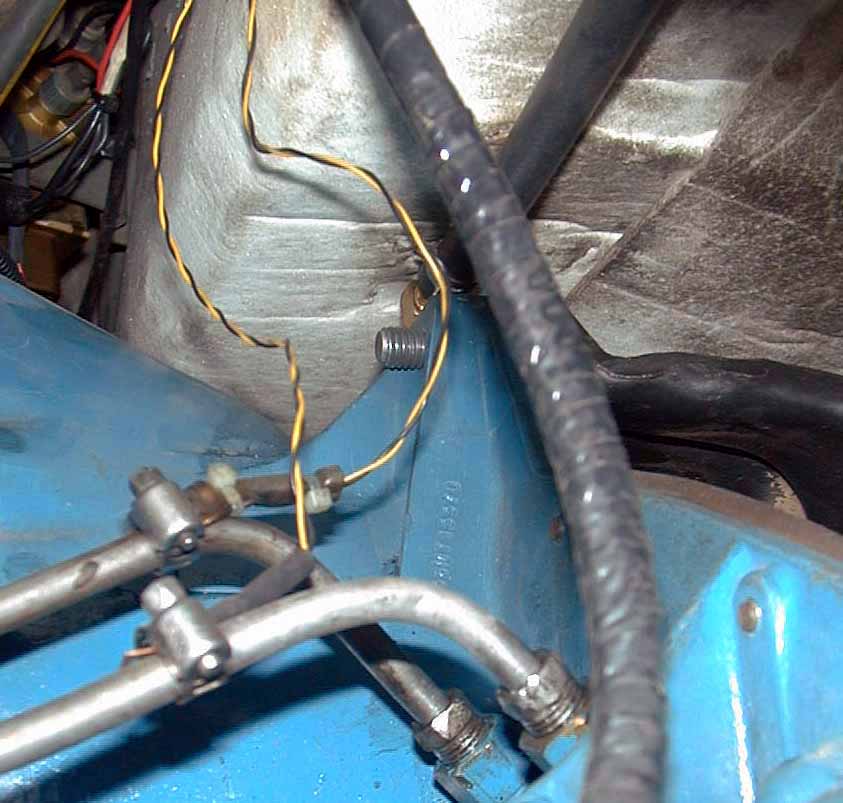
VACUUM MODULATOR PROBLEM
Tranny Guy found the 90 degree rubber hose from the vacuum pipe
into the modulator was collapsed. I guess from old age and a
tight
corner it was almost closed off and when vacuum was applied, it did
close
off. The modulator was ok the hose was bad. You might
want to check yours.
-------------------------
WILL NOT SHIFT TO HIGH
The steel line leading down from the intake manifold to the modulator
has a OEM pinch in the tube at the top end, where the hose from the
intake
manifold fastens on. This "pinch" in the steel line was intended to
even
out the vacuum fluctuations from the engine to the modulator. The steel
line, especially the "pinch" section, gets plugged with carbon, etc
from
the intake manifold, especially when an engine back-fires and coughs
back
up thru the carburetor. This causes a pressurized intake manifold and
it
will spit a lot of junk into all the connections of the intake
manifold,
one of them is the line going to the tranny modulator.
The steel line may have also got kinked or
smashed
during some type of engine or tranny service. Some of the steel line
fasteners
will show quite a bit of rusting, so take a look at them, they may be
rusted
into the steel line.
To clean the steel line, remove the hose at the
bottom
end where it attaches to the modulator. Now remove the hose on the top
end where it comes from the intake manifold and squirt some carb
cleaner
into the steel line and let it soak for a while. Do this several times
and see if the carb cleaner comes out the bottom end. Once you get the
crud loose, shoot some shop air thru the tube to finish the cleaning.
The tranny will work OK with a straight (no
pinch)
line, it will just have a slightly quicker and firmer shift, something
you will hardly ever notice on a MH because of the weight. I would
recommend
cleaning up the steel line and see how serviceable it is, the Toro's
had
the same line, if you need a replacement. Good luck and Happy
GMCing
Bob Drewes
--------------------------
Things you can check.
Low on fluid
Even half a quart low after the tranny is hot, tranny may or may not
shift.
Low vacuum.
Low vacuum condition will shift at wide open throttle.
Check the vacuum at the hose going to the modulator. Engine needs to
be on but you should be able to tell if you got good vacuum.
The modulator valve could be sticking. Manny 2012
------------------------------------
OIL IN THE SPEDOMETER CABLE
There should never be transmission oil in the spedo cable. He
says this is a common problem with these transmissions. There is
a small seal in the assembly that goes into the transmission for the
speedometer
pick off. This seal in mine was cocked from some previous
work.
This is not the O rings, but a seal. If you have a leak at the
spedo
cable, you might want to check this seal.
MOUNTAIN DRIVING
MOUNTAIN DRIVING
Please don't learn the hard way like I did when I first started
driving in Colorado. I would like to pass-on a little of what I have
learned.
#1 don't go down a mountain road any faster than the you can go up
it.
#2 Don't use your brakes to hold your speed down shift to S or L.the
the only time you step on the brake petal is to slow while your
shifting
down. [Once I followed Rick Staples down Wolf Creek pass a drop of
approx.3000
ft.in 3 miles and his brake light came on only once as he shifted
down].
Believe it or not but your brakes should last twice as long in mountain
driving than on the flatland!
#3 Never ever, ever put your left foot on the brake that is one of
the
worst driving habits you can have!You may think you are not riding the
brakes but you are, to do so your not leaving space between the brake
shoes
or pads and drums to allow them to cool. Your brakes should run cooler
in mountain driving than on the flat it's up to how you drive.
Now as far as going up hill shift down and if it's a hot day turn
off
the a/c till you get to the top. If your engine gets hot pull over but
don't shut it off just let it run without a load until it cools. Get
down
an look to make sure those flatland bugs have not plugged up your
radiator
core. mountain air is thin and does not cool as well. From my house the
road to the west goes up to 12,183 from 5,000 ft in 40 miles so if you
should come this way remember the pressure in your tires well increase
the higher you go and your air boots should be set in auto. Colorado is
beautiful come an enjoy. Jim Anstett Loveland Colorado
SHIFT POINTS
I shift down to 2nd gear when I pull down to 40 mps.
Shift
down to 1st gear when I pull down to 25. Upshift again at a
little over 30mph. Topped these passes from 25mph at Raton,
to 35mph. Justin
------------------------
MOUNTAIN CLIMBING IN THE " S " POSITON
I have advocated using "S" rang in the mountains.
1. When in "S", the tranny line pressure
(which
applies the clutches) is increased from its normal 60 to 90 psi, to a
more
robust 135 to 160 psi. This almost doubling of pressure should
greatly
reduce the chance of slipping/burning-out your clutches.
2. In "D" or Drive range, both the 1-2 and
the 2-3 upshift are effected by a multi-disc clutch picking up the load
from a sprag or overrunning clutch. This simplifies shift element
timing (you needn't be sure the lower gear apply element releases
precisely
when the higher gear element applies), giving smoother upshifts with no
danger of "flare" or overreving between gears. (If anyone recalls
the Peter, Paul & Mary routine about "The Kid" drag racing "Mr.
Businessman"
who just had his "bands tightened", you know
what "flare" sounds like.) ;-) OTOH, this
arrangement
means there is NO engine braking in 1st or 2nd gear drive range.
Since this is hard on brakes in hills and traffic, GM provide the "L"
and
"S" ranges. In these ranges the sprag clutch is supplemented by a
band (actually a form of brake) which holds
the given gear element stationary against force in EITHER direction,
restoring engine braking. (Of course now we must release the
lower
gear's band when upshifting, but hey, Hydra-Matic's been doing this
since
1938.
They can figure out the timing.) IMHO, these bands also shoulder
some of the load when accelerating forward, assisting the sprag
clutches
in their mission. 3. Of course, "S" keeps the
transmission
from upshifting into 3rd gear, and may also raise the 1-2 shift
point.Rick
Staples
Manual Kickdown Switch
' I do think a manual kickdown switch could be useful at
times. I have long advocated the use of "L" and "S"
positions
in mountains, etc. When you place the selector in 1st or 2nd
positions,
you do two things. 1) You increase the line pressure, increasing
the holding power of the clutches. 2) You apply a band
which
serves to provide engine braking on deceleration AND shoulders some of
the load of the overrunning clutches, increasing the torque-handling
ability
of the trannie.
Bottom line: using the column selector lever to shift
to 1st or 2nd is a good thing for your THM425.
TYPICAL TRANSMISSION TEMPERATURE
Using :
Ragusa pan,
external cooler,
Towing a Saturn everywhere, in east central Florida,
the transmission temp. stays around 170 degrees.
Ragusa Pattern Shop
Santa Ana CA
949-261-5898
------------------
My trans gage seems to run about 140 with the toad and 130 without.
This is pan temp. Ambient usually around 85-95f. This is hiway cruising
with almost no climbing (Florida) In city driving temp will escalate
about
10-20 degrees.
To compare with exit temp from converter add 50 degrees.
David
-------------------
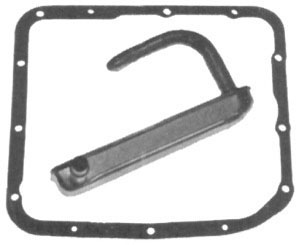
GASKETS AND FILTERS
Went to NAPA, asked for the filter from a 73 Toronado. Got a flat
filter
(FT-1019), I didn't know this was incorrect until I pulled the pan from
my tranny and
saw the long, two tube version (Had AC 169 stamped on it). Took
the flat filter back and showed them my filter. After spending
some
time looking in the book
he said "Oh you want the old style FT-1019, we have to order, will
take awhile".
Decided to try and find one in stock somewhere else. After
much
searching, found one on the back of a shelf in a local parts
store.
Looked like it had been sitting there since the mid 70's.
So my conclusion was, make sure you tell the parts guy you want the
old style filter as the flat and two tubed filter do have the same part
number.Eric H.
----------------------------------
when I searched AutoPartsWest for an AC/Delco, I searched for the
PF-169
as listed in some of the references. They replied back that the PF-169
has been superceded by TF-169. Might make a note of it. Toby
-------------
When you buy a Fram FT 1019 transmission filter, the gasket comes with
it. About $12 at Parts America. The service manual specifies
TH425
oil and filter change at 12K mile intervals. Same for final
drive.
Gasket only for final drive is Fel Pro RDS 55034. Get from Parts
America
also but they will have to order it; same for Pep Boys. Price:
about
$6.00.Fred
------------------------------
 The
Fram FT1019 is a good number. The illustration on the PartsAmerica site
(at least the one that my computer receives) for the FT1019 is an
illustration
of a flat filter.
The
Fram FT1019 is a good number. The illustration on the PartsAmerica site
(at least the one that my computer receives) for the FT1019 is an
illustration
of a flat filter.
The flat filter is incorrect. Good number, wrong picture on the PA
site for the Fram FT1019.
According to other references I have, The FK117 is also a good
number
for the THM425. The illustration on the PA site shown for the FK117 is
also correct for the FT1019, and should be shown for the FT1019. It may
also be (and probably is) correct for the FK117. I've never actually
put
hands and eyes on the FK117, but word references indicate that the
FK117
is a good number for the THM425. T.Maki
You might want to go to the advance auto site
http://www.partsamerica.com/default.asp
and find the tranny filter for a 1976 toronado. You can see a picture
of both the FK117 and the FT-1019.tom
--------------------------
OVERHAUL
Repair and rebuilding of my transmission was $1600.
Reasons:
upgraded torque converter to heavy
duty,
new teflon bands,
new high pressure disks with many
more teeth than the original.
It seems the original was marginal and what they did was not only to
upgrade it, but to put in all new heavy duty parts. The reason I
decided to do that was because I lost my Trani just 13 months after it
was rebuilt to original specs.
1 There is a great transmission shop in Dublin CA
.
Mel and Jeff are great and
they did a wonderful job
rebuilding
my trans when it went out.
They can be reached at
925-829-1120.
Al
2 Gary Haslip (800) 341-1429 Eugene, OR
Heavy duty transmissions with Allison
torque convertors and shift kit in stock. A
transmission with everything heavy-duty
+ a lifetime warranty is $2300 installed
(in Eugene).
3 We've got another one right here in River City (Bandon).
Precision RV Service And Transmission Rerpair
347-6031. He does RV repair, but
for mechanicals I prefer Anderson Automotive.
For transmissions though, the guy is
really good. He had a shop in California and
specialized in race car stuff.
4 Dunn was $1550 + freight one way. They pay
the return freight - air freight on mine
was $275 to Ontario,
CA. Dunn also includes the 3.50 gears as standard.
Tony Dunn told me the
special
things they do to their transmissions to work in the
GMC. They also have
a 3 year 36,000 mile warranty. Installation was $900 in
San Luis Obispo, CA.
The local transmission
shops
would only install their own rebuilds so we went to an
independent who would do
the R&R. This is what we did Eric Tipton
Transmission Vent Extension
There is an elbow that will go into the vent hole after removing the
vent. You can remove it with a pair of wire cutters by squeezing and
lifting.
The elbow, GM part number 865-2580 is stocked in Michigan so needs to
be
ordered but its only 3 or 4 bucks. Anyway, press it down into vent hole
and attatch a 1/4" hose to it. If you want a pic of it, let me know off
line.Manny
Oil escapes from this vent if the transmission is over filled ,
during
a catistrophic failure of the transmission and some modes of normal
operation.
The oil then drops directly onto the exaust system and has caused many
fires in GMC motor homes'. gene
Wes Caughlan had an article and inexpensive solution for the Trans
Vent
overflow
problem in the June '98 issue of GMC News. He used 38" of 3/8
"fuel line hose, GM PCV hose # 25508425(for elbows) and vent cap
#8460496.
Use one of the elbows to attach to vent of transmission, connect with
short
length of 3/8 copper tube to 3/8 fuel line hose run into aluminum
u channel under floor attach vent cap on end. This places the 'vent'
out
of harms way. Mark
---------------
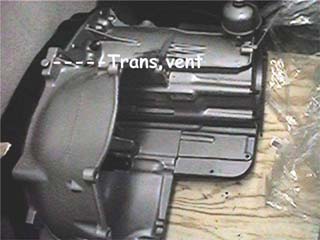
The vent you are looking for is located on top at the front of the
transmission. With the engine cover off, if you look down just below
the
firewall you will see a small metal cap, that is if it is original.
This
cap is covering the vent tube. This vent is what is replaced with a
tube
or hose to route transmission fluid away from exhaust and hot
parts.
The cap is crimped onto a notched steel tube and can be popped
off.
The tube is pressed into the transmission and can be pulled out.
You can attach a moulded rubber 90' elbow to the original tube or
replace
the tube with a threaded fitting. JR
---------------
My vent was extended over to a coolant recovery tank mounted
behind the wheel well. This was to catch the overflow. Gene
----------------
 Hard
to see but connector has been added
Hard
to see but connector has been added 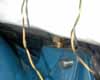 pix by Mr.C (CLICK ON PICTURE TO ENLARGE)
------------
 Pictures
by Steven
Ferguson
Pictures
by Steven
Ferguson

Transmission Vent...Not as easy as it sounded. Removing the
darn
OEM vent creates fragments as the vent is equipped with circular barbs
which displace transmission case metal in order to retain it. The
vent was free to rotate but was very resistant to removal
until
the barbs enlarged the opening in the case. I cleaned out
everything
I could find but a transmission fluid change is probably in the near
future.
The OEM vent had a machined ring-like hat at its top with a OD of
0.50"
but a height of only about .150" or less, far too thin to use with a
1/2"
hose. If one were to grind off the top hat, it would leave a
short
cylinder stub of about 0.35" dia, a littIe small for the 3/8"
tubing.
I ended up using 3/8" coppertubing, tapering it to about .350" to
wedge into the transmissioncase hole (~.35" dia). It seems
secure but I still don't like
the idea of the metal bits created by removing the original vent.
Nothing's quite as simple as it first appears...
John
[INDEX] | [SUGGESTIONS]