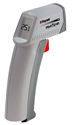
DIGITAL THERMOMETER
[Multi-Point Thermometer] [LASER]
LASER THERMOMETER
 This seems to be a very useful and popular way to keep track of bearings,
hubs, tires etc. There have been at least two incidents, where alert GMCers
using this tool, have caught problems before they became trip ending events.
This seems to be a very useful and popular way to keep track of bearings,
hubs, tires etc. There have been at least two incidents, where alert GMCers
using this tool, have caught problems before they became trip ending events.
Steve F. found the different temperatures shown below and upon further
inspection found bad bearings in the offending Hub.
Mr.C found a 100 degree difference in one of the rear drums, and when he
opened the wheel, he found a spring (replaced about 1999) had broken and
allowed the brake shoes to drag. This wore out the brake shoes and
probably was cooking the bearings.
The best source I have heard about is
http://www.thetoolwarehouse.net/shop/MAN89.html
provided by Al Kruebbe.
I thought it would be good to start a list of what readings we should
expect on various points.
| LOCATION |
GOOD TEMP READINGS |
BAD TEMP READINGS |
|
|
|
| FRONT HUB |
140 |
205 |
| FRONT WHEEL |
|
|
| FRONT TIRES |
|
|
| REAR WHEELS |
|
|
| REAR DRUMS |
|
|
| REAR TIRES |
|
|
| RIGHT MANIFOLD |
|
|
| LEFT MANIFOLD |
|
|
Newly Discovered Diagnostic Tool
I was getting our GMC ready yesterday for our yearly fishing trip up in the
northern CA when I discovered the engine was missing. I was dreading
having to remove the front wheel wells to get to the sparks plugs to find
which cylinder was missing. When I was walking out the entrance door
I just happened to notice the small hand held infrared temperature indicating
device that I keep next to the door for checking tire and wheel temperatures
when I stop during traveling.
The old brain woke up and said why not use it to determine which cylinder
was missing. With the engine cover removed, it was very easy to determine
the temperature of each header pipe next to the engine. In about one
minute I was able to determine that the # 8 cylinder exhaust pipe was much
cooler then the others. I was about ready to remove the right front
wheel well when I happened to notice a rubber cap on a vacuum port on the
intake manifold was severely cracked The vacuum port was on the rear
side where I had disconnect the vacuum line for the OEM cruise control when
I put on the electronic cruise control. The vacuum leak was causing
a lean mixture going to # 8 cylinder to the point it was misfiring.
It only took about five minutes to find and fix the problem so the infrared
device paid for it's self today in saving me a lot of time looking
for the problem. This is probably "old hat" to some of you, but I had
never heard it talked about before. I hope it helps someone else. Chuck
Aulgur La Mesa CA
Multi-Point Thermometer
There have been tons of questions about temperatures on the GMC motor home.
It seems that we are always asking what is the heat rise of the Refer, the
engine compartment, the batteries, the transmission, etc. I have
often wondered while driving down the road if my wheel bearings were getting
hot, were the brakes hot? did I hear a strange noise back by the generator,
was something getting hot there , was I over charging a battery on a hot
day. I wanted a multi-point thermometer that I could switch from the
drivers seat that was inexpensive. Accuracy of plus or minus a few
degrees is ok with me since I am looking for large changes of temperature.
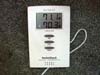
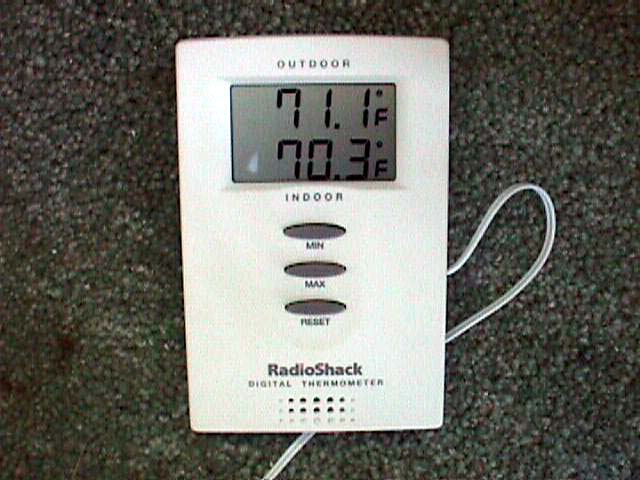
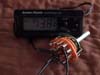
I have modified a dual readout thermometer from Radio shack that costs
nine dollars to Twenty five dollars. The thermometers store the max and min
temperatures and these reading can be viewed by pushing a readout button.
They even have one that will give voice readings every hour and will give
a vocal warning if the temperature goes over a set point. I have modified
the instrument so that the two channels are fed by two external
6 position switches which are connected to 12 thermistor sensors that I also
manufactured. The Sensors cost $2 each. The thermometers have
the advantage of operating from internal batteries so there are no ground
loop or noisy power supply problems. The unit shown above is the one I will
use in my GMC.
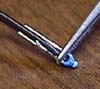
Building Sensors
Radio Shack has all of the parts you will need for this project. The
Sensors are made from a RS -271-110A ($2) Thermistor. (Note not all instruments
use this 10,000 ohm sensor. Some are using a 50,000 ohm sensor
for which I do not have a source.) A thermistor changes resistance with
temperature and this is the sensor used by these inexpensive instruments.
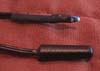
The wire to the sensor is the smallest two conductor speaker wire you can
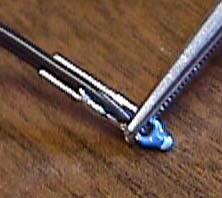
get. Radio Shack has several types. Strip the wire back 1/4 "
and solder a wire to each leg of the Thermistor which is placed over the
top of the zip cord as shown. It is a good idea to protect the thermistor
with pliers while soldering the connections as shown.
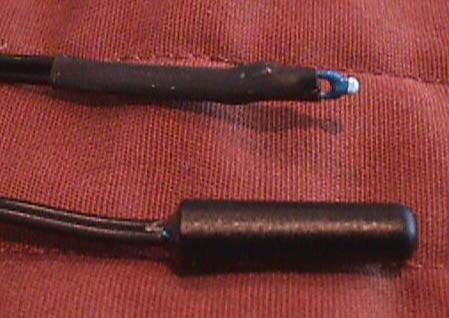
 Use shrink fit tubing over the connections , leaving the thermistor exposed.
We will attach the thermistor to a mounting appliance later. The
picture compares the fabricated sensor to the Radio Shack sensor that comes
with the instrument.
Use shrink fit tubing over the connections , leaving the thermistor exposed.
We will attach the thermistor to a mounting appliance later. The
picture compares the fabricated sensor to the Radio Shack sensor that comes
with the instrument.
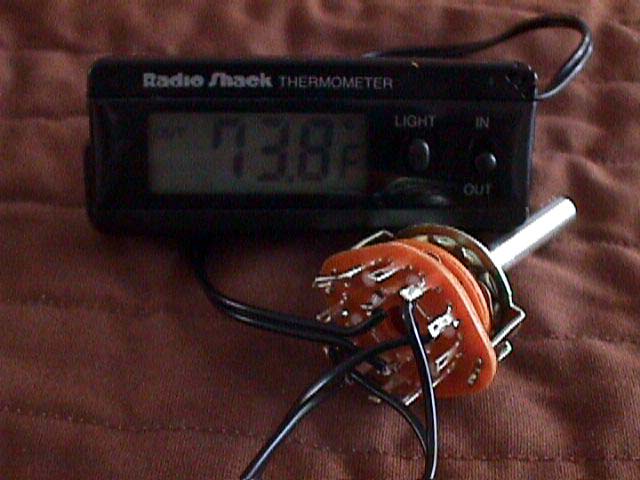
 The two pole, 6 position (RS-275-1386a )switch will allow for 6
sensors , 5 fabricated plus the one that came with the instrument.
The wire from the instrument that went to the external sensor is cut and
attached to the swinger contacts of the switch. The sensors are then
attached to the rotary connections of the switch so that a pair from each
sensor is selected at each position. There is no polarity on the sensors
so either wire can be used on either connection. There is no practical
limit on the length of the wire going to the sensor. Now when the Digital
Thermometer is in the OUTSIDE switch position, the rotary switch
selects the sensor to be used. The instrument shown cost $9 from
Radio Shack on a closeout sale.
The two pole, 6 position (RS-275-1386a )switch will allow for 6
sensors , 5 fabricated plus the one that came with the instrument.
The wire from the instrument that went to the external sensor is cut and
attached to the swinger contacts of the switch. The sensors are then
attached to the rotary connections of the switch so that a pair from each
sensor is selected at each position. There is no polarity on the sensors
so either wire can be used on either connection. There is no practical
limit on the length of the wire going to the sensor. Now when the Digital
Thermometer is in the OUTSIDE switch position, the rotary switch
selects the sensor to be used. The instrument shown cost $9 from
Radio Shack on a closeout sale.
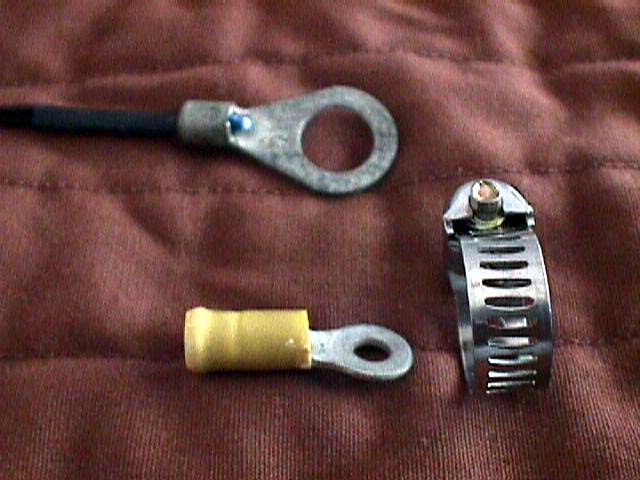
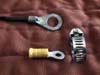 The fabricated Sensors can now be attached to terminal lugs as shown
for different applications. The top terminal shows the Sensor will
slide into a terminal which can then be bolted to device to be monitored
like a battery. The Thermistor should be epoxyed to the terminal
with J-B weld and then shrink fit placed over the wire and terminal for strain
relief. The lower terminal shows that a smaller terminal can be used
and then a hose clamp used to attach the terminal to a pipe to be monitored.
The Sensor could be J-B welded to a position like on a Hub, but this would
make it difficult to remove for repair or relocation. J-B weld was selected
as the epoxy because it seems to have good thermal conducting properties
but it does not conduct electricity.
The fabricated Sensors can now be attached to terminal lugs as shown
for different applications. The top terminal shows the Sensor will
slide into a terminal which can then be bolted to device to be monitored
like a battery. The Thermistor should be epoxyed to the terminal
with J-B weld and then shrink fit placed over the wire and terminal for strain
relief. The lower terminal shows that a smaller terminal can be used
and then a hose clamp used to attach the terminal to a pipe to be monitored.
The Sensor could be J-B welded to a position like on a Hub, but this would
make it difficult to remove for repair or relocation. J-B weld was selected
as the epoxy because it seems to have good thermal conducting properties
but it does not conduct electricity.
Limitations
This system does have some limitations. The accuracy is about plus
or minus 2 degrees and the reproducibility is about the same. The upper
limit of the temperature is about 130 degrees F which limits some of the
engine measurements. However, if you are looking for failure conditions,
it might be possible to measure a location that does not routinely reach
that temperature, but would on a failure condition.
Application
I hope this project will encourage GMC owners to make measurements and
post the results on GMCnet. For example, I am sure you would like
to know it really helped to place the rear panel 1/2 inch behind the coils
in the Refer. Now you can take temperature measurements before and
after at the top, bottom, freezer , and cabinet of the Refer. I know
many of you want to know if your batteries get hot during charging /driving
/ discharging. I know I want to know , and I will soon let you know.
All of this for less than the cost of dinner.
Gene
[INDEX] | [SUGGESTIONS]