Most likely your high speed blower relay is shot, or the wire that is the power feed to it has corrosion on the push on terminal.
Your problem is probably a broken pin.
If you take it apart I have found that you can take some very fine
wet or dry sandpaper or crocus cloth and polish the face of the rubber
disk and around the plastic disk and when you reassemble it use some
silicone grease (CAUTION: to those with O2 probes DON'T use silicone
grease as it will be drawn into the intake manifold and will quickly
ruin the O2 probe). If you have an O2 probe just use some light
oil to lubricate it.
Emery Stora
77 Kingsley
Santa Fe, NM
In about mid-year 1977 and for all 1978 models they made some changes. I wasn't looking at the book and was somehow thinking that it was the second generation but after looking at the 1975-76 Maintenance manual I see that they called it Type I and Type II in those model years. If one were to look at the control panel you can tell which model you have. The only difference in the control panel appearance from Type I to Type II is that the fan switch on the left side has an OFF position for the type I and it says LO for the Type II. Some of the 1977 models have the Type II but in mid year they did another upgrade with quite a few changes. The appearance of the control panel has the same LO at the bottom position of the Fan switch but the AIR COND section shows MAX on the left and NORM in the center.
The other changes made to the system in 77-78 are:
1. Increased refrigerant charge -- 3-3/4 pounds instead of
3-1/2 pounds.
2. New A/C heater control head and new control panel components.
3. New A/C plenum and revised duct system.
4. New vacuum system.
5. Revised heater and evaporator assembly.
6. Baffles added at condenser and heater/evaporator housing.
7. Addition of time delay relay in blower circuit wirings.
8. Externally equalized thermal expansion valve.
9. Smaller diameter high pressure service fitting on late 77
model vehicles and on all 1978 model vehicles - fitting size is
3/8"-24.
10. Revised compressor mounting.
11. Inverted vacuum tank mounting.
12. Revised Discharging, Evacuating and Charging Procedures.
As I said previously, not all 1977 models have these changes.
The earlier production have the Type II. My 1977 was manufactured
in 11/76 and it does have this newer design. Emery Stora
| ZB |
YEAR |
DATE |
TYPE |
AIR FLOW CHANGES |
LINKS TO MODIFICATIONS |
| 1 |
EARLY
73 |
NO
RECIRC |
|||
| LATE
73 - 74 |
RECIRC
DOOR |
http://www.gmcmhphotos.com/photos/showphoto.php?photo=2717 |
|||
| 2 |
74 -
76 |
DEC 75 |
I |
NO
RECIRC |
http://www.gmcmhphotos.com/photos/showgallery.php?cat=4122 http://www.gmcmhphotos.com/photos/showgallery.php?cat=4463 |
| 3 |
76 -
77 |
II |
NO
OFF - NO RECIRC |
http://www.gmcmhphotos.com/photos/showgallery.php?cat=4637 http://www.gmcmotorhome.com/tech/heatfan/index.html |
|
| 4 |
LATE
76 - 78 |
NOV 76 |
III
? |
NO
OFF - RECIRC DOOR |
http://www.gmcmhphotos.com/photos/showphoto.php?photo=19564 http://www.gmceast.com/HVAC%20Systemsfinal%20KH%20Watermark.pdf |
Duracool is a packaged propane butane mix that cools with greater efficiency than R12, and cost about $20 to fill your GMC. It is illegal in some states. I am testing it in my GMC, which ran my own "home brew" of propane and isobutane (55 to 45%) that worked better than R12 but was a pain to refill. Also my Head pressures were a little high (250 psi on a hot day). Now I'm running 40 to 140 low to high. If you don't know what I'm talking about that's ok. Here's what's important.
My system leaks. I don't want to fix it as the
leak is very slow and when I redo the whole coach I'll replace
everything. Until then what can I do? I ran my own mix, but I wanted to
try a commercial hydrocarbon mix. Duracool seams to work much better
than R134a, and possibly better than R12. I won't know until further
testing. But, this stuff is cheap, $5.50 for 6 oz, which equals 15 ozs
of R12. That means about $20 to fill your GMC.Mark A
Here are some bits of
information that we learned at Osoyoos: (5/5/5)
1 AC technicians do not like to use 134, it is harmful to their health.
2 You do not need a vacuum pump to charge with Hydrocarbon refrigerants
like DuraCool (Propane).
3
In fact they work better
if you do not pull a vacuum.
4 Propane will mix with whatever you have in your system. There’s
nothing to change.
5 Recover the existing refrigerant (most of our systems are already
empty).
6 Add 3 cans of DuraCool
7 Use Glacier Gold if
you have a leak, every can has a dye for leak detection.
8 Run the compressor, and measure the low side with your tire gauge.
9 You should have 30 lb of pressure. If it’s too high let some out, a
little low will be ok.
It should be 20-25 depending on the ambient temperature and measured
at. 1500 rpm. - emery 2012
10 Put on the 134 adapter connections, and the system is legal.
11 Mark the system as filled with DuraCool or Propane.
12 You are done, no gages, no pump, no changes.
13 Propane is more efficient. Your compressor will use 40% less
horsepower.
14 The head pressure is lower with Propane, the compressor will last
longer.
15 It will cost you $30 for the Propane and taper hose.
16 Propane
has a higher auto ignition temperature than 134. (Propane still lights
more easily)
17 Propane leaks less than R12.
It has never been easier to do your own AC work. It is interesting to
note that there is also a hydrocarbon mixture that works on a home or
coach AC to replace the R-22 with the more efficient refrigerant.
Note: The EPA has issues with Hydrocarbon refrigerants. You should read
this link and make your own decision: http://www.epa.gov/ozone/snap/refrigerants/hc-12a.html#q9
The above information and more technical detail are available on these
web pages:
http://www.foxtoolsupply.com/
http://glacier-gold-refrigerants.com/index.html
http://hc12ausa.com/
http://www.duracoolusa.com/
http://www.duracool.com/
http://www.duracool.com/ecom/shoppingcart.html
DURACOOL FAQ LINK
WEST COAST SOURCE FOR DURA COOL
I bought a case of 12 cans and several of the fittings from
them last year. I was just over there a couple of days ago, and they
still carry it. Prices are competitive.
FRUIT GROWERS SUPPLY
3631 CENTER ST
RIVERSIDE, CA 92501-1126
Phone: 951-369-9741 Tmaki
Called Chet at Shamrock Consultants in Fresno Ca.
Shamrock is the out let for Duracool 12a in California or as Ken would
say Kalifornia.
His phone number 559 255 9413
IDEAL COOLANT SOLUTIONS Serving Washington and Oregon
you
might run into someone who wants to replace your R12 with "FR-12" or
"Freeze-12" or "Frigc". These three (and several others) are
simply 134a with an additive that makes it slightly less violently
incompatible with 500sus mineral oil. Long term you could have
problems with Freeze 12.
They are still basically R134a and not
in the same class as Duracool which is totally compatible with
both a R12 and a R134a system EmeryS
AUTOFROST
R406A (Tradename Autofrost) does everything > you claim for
Duracool, but IS legal. Once again, why fool with an
inferior, illegal product like Duracool, when there are far
better alternatives?
R406A is not a Hydrocarbon refrigerants, and is
basically nonflammable. Good stuff there, if you are worried about
flammability then R406A is a good refrigerant to use.
Now here are a few
problems with R406A:
First, this product requires barrier hoses, so ALL AC hoses must be
replaced. Duracool can use the old original hoses.
R406A can have compatibility problems with the compressor seal. Your
compressor seal must be Neoprene, or it will fail, Duracool has no
compatibility problems.
R406A must be recovered, ie; must be sucked out of your system by
a licensed AC repair shop, (good luck, the vast majority of AC shops
won't dare contaminate their equipment with it, you have to find a shop
pushing R406A). You can dump it in the atmosphere but that's illegal,
and
R406A is only 95% non-corrosive to the Ozone layer, Duracool is 100%,
and though they tell you to recover it, the backyard amateur owner
mechanic can dump it, it has NO regulated HCFC's.
R406A cannot be used with ester (PAO) or PAG oils, if you system has been converted to R134 then it almost certainly contains ester oils and must be flushed, especially the compressor.
R406A contains some very small molecules, and if there are any leaks in your system, they will allow the "lighter" elements of R406A to dissapear,(why it needs barrier hoses) and your system will become inefficient and ultimatily lose cooling ability.
Other than that, R406A will work great, and if you rebuild your
system and cover these problems it is an excellent, fire safe
refrigerant. I use duracool because I'm cheap and it's cheap and will
work great in an old
leaky system. It costs be about $30 to charge my system, and so far 2
years
down the road it's still working great.
In all my years of working as an auto mechanic, I've not seen a car
with the peculiar state of damage that would allow the evaporator to
leak without massive leakage under the hood. Remember, the amount we
are talking here is ounces, there is very little of this stuff in the
AC system. I
carry a gallon of camping fuel in the coach for our camp stove, that is
far more dangerous that my AC. And yes, that needs to be stored
outside.
One last thing, go to the Duracool website and read
up
on the legalisms, you might be surprised. I understand that some
insist
on this, and others insist on that. I insist on nothing, except
tolerance
for other viewpoints.
Thanks;
Mark A
SECOND KNOWN GMC - DURACOOL
INSTALLATION
After pumping the system down and making sure that this time there were
no leaks, I took the plunge. The directions say that you fill the
system by volume and not by amount. That means you need gages to
monitor
the low side while adding the DuraCool and then you are suppose to
bring
the pressure up to 35lbs. This is when they say it is full.
There was a chart at duracool.com that shows the equivalences between DuraCool and R12. This shows 6 oz of DuraCool equals 17 oz of R12. Our systems use roughly 3.5 lb. of R12, so this converted to just a little over 3 cans of DuraCool. The kit that I bought from DuraCool had 3 6 oz cans in them. I went ahead and put 2 cans in quickly, and the pressure came up to around 10lbs. I then slowly added the 3rd can, and watched the pressure come up to the 35lbs.
I let the system run for 30 minutes or so (at about 1000 rpm), and the pressure stayed at the 35lbs. So, I didn't add anymore. It's blowing real cool, and we are excited about having AC for the trip this weekend. All in all I'm happy with it. Now I need to make the recirc mod, cause right now all of the inlet air is coming from the hot engine compartment.
The DuraCool kit cost me $37 (3 6 oz cans plus the hose to puncture
the can and attach it to the R12 shrader valve). 5 12 oz cans of R12
would have cost me $100-$150, and that would be if I could get anyone
to sell it to me.
R134a does not require barrier hoses, only refrigerants containing HCFC 22. The original oil used in R12 systems is not soluble in R134a so a different oil must be used. If Ester Oil is used, no special "O" rings are needed, and the system does not have to be flushed.
The receiver dryer should be replaced to provide adequate water absorption, and because it is often impossible to drain the old oil from it. The compressor's oil should be drained. The expansion tube (if any) should be cleaned or replaced. Only most of the old oil needs to be removed, the oil R12 oil is soluble in the Ester oil, but you don't want too much of it. Replace the receiver dryer and drain the compressor and you should be ok.
Vacuum it down and check for leaks. I used to do this by
injecting about 2 ounces of R12 (in the old
days, the 1970's) and then charging the system with 90psi of Nitrogen.
Any leaks would be easy to find.
When the system is to your liking re-vacuum it down. In most GM systems
add 6 to 8 ounces of Ester oil and charge the system with R134a. You're
done for about 5 to 8 years.
The calculated amount of R134a for the stock GMC according to my AC guy is 2.9lbs.Henry
I was NIASE approved as a general mechanic, with several specialties, one of which was AC systems. The name NIASE will tell you how long ago this was, I believe it is now called ASME. Everyone has different needs. R 406A is a fine product, has a low compressor high pressure, and is cold. If you replace your hoses you shouldn't have any problems but for your shaft seal, and that can be rebuilt. I don't know of any shops that maintain a recovery unit for this product but I live in the boondocks, in a large town or small city I bet someone has one. You will need it because the R22 part will leak down unless you have a very tight system. That is why I prefer R134A, which does NOT cool as well, but can be filled up at home anytime. Good for old leaky cars, but I as a professional cannot service any system that leaks without repairing the leak, EPA regs. If I find a small leak at your shaft seal (almost always) I am forced by EPA regs to replace the seal or pump. Pain in the butt and big unnesessesary $.
One last thing, I know of several shops that convert to R134A by
recovering all the R12, adding 4-6 ounces of Ester oil, and charging
with R134A. No other changes. I don't have the balls for that but they
say it works and works for years. They just don't admit that this is
what they do because this is a real profit center for them.
Mark A
Wind Wings and Screens
I have made the following colored wings:
Solid - Black, White, Light Blue, Dark Blue, Brown
See thru - Light Green, Gray, Smoked copper, Blue.
But I could get other colors. All the hardware to install the
wings are made of stainless steel.
Of course if you have wings you must have screens. The screens
I make have an aluminum frame and
fiberglass screen mess and are self contained.
If you are interested, you can reach me by
e-mail dsekula@tds.net
or phone (765) 522-3241
By the way, I am on the digest. I am usually several days
behind in reading the posts.
Blaine Merrell
101 Way West Airpark
Bainbridge IN 46105
Climate Control Fan Switch "off" Modification
Air Conditioning Upgrades
Major change occurred in two year increments, with the best being the
'77/'78 coaches. After our recommended maintenance/up-grades we were
happy with the Dash A/C operation. Sealing the doors to separate the
Hot from the Cold is a small job with big pay back. Also, converting
the A/C into a completely air recirculation system was the biggest pay
back. A simple 10 minute job for all systems except for the coaches
that have the added "Air Horn" to the center/bottom dash. This system
is called the "Type II" system & requires more work to achieve some
Air recirculation...a half-day job, but worth it.
With my Privacy Drape closed behind the Pilot/Co-Pilot seats, recirculate mode, outside air at 100 degrees, I am able to obtain 38 degree air out of my center a/c duct. After a while, it gets too cold & we open slightly the drapes to get the desired cooling. Needless to say, we are now happy w/our a/c system. The Dash A/C can not cool the entire coach on a Hot Day (above 100 degrees), but does a great job of cooling the cockpit area.
In some cases, only adjustment of the Temperature Door for full
closure makes a significant difference in cooling. Shutting off the Hot
Water from flowing thru the Heater while in the A/C mode is also very
helpful. The adjustment is located behind the Control Panel as an
in-cable adjustment. Adjust for full Temperature Door closure as
observed out front, drive side of A/C & Heater Box.Duane
I thought I had an on board fire on
monday when a big volume of smoke started pouring out of the a/c vents.
When I checked, I found that the heater box had a bunch of grass and
debris in it that had been ignited by the blower fan resistor.
http://www.gmcmhphotos.com
Scott
John recently posted a method for
vacuuming in tight places using successively smaller sections of
flexible tubing and a turkey baster. It might be helpful in cleaning
debris from the heater box through the opening shown in Scott Cowden's
pictures:
http://www.gmcmhphotos.com
Bob Burkitt
Heater Blower Fan
I found that the new AC/Delco model comes complete with a new fan
cage, but costs close to $65! I went with the Siemens motor, part
number PM102/SL1587 instead for half the money.
Mark
Here are pictures of the replacement by Arch
http://www.gmcmhphotos.com
http://www.gmcmhphotos.com
High speed does not work
Most likely your high speed blower relay is shot, or the wire that is
the power feed to it has corrosion on the push on terminal.
The one you want is a NAPA ECHLIN Part# AR109.J.R. Wright
With the engine off so you can hear better, turn the key on, move the top heater / AC control lever to any setting but "max", then move the fan speed switch up to high. You should hear a 'clunk' as the relay energizes. That tells you how big your problem is. If you don't hear the clunk, then the relay coil is open or the ground to the relay is no good. You can test for voltage on the coil of the relay with a 12 volt test light.
If you hear the clunk, it could still be the relay, but most likely it is the voltage source to the relay. That wire (which I think is red) carries enough current that the push on connector can go bad. (This might be a resistance wire that is burned out. Test for voltage at each end of wire)
An easy check is to turn the fan on high (and it won't even be running) then go out front and wiggle the whole plug assembly on the high speed blower relay. You can also check it with a 12 volt test light, the kind with an awl like pointed end is the best way to test problems like this.
> The high speed blower relay kinda' looks like a horn relay. On my '77, it is on the firewall on the passenger's side.
This is under the little access door at the passenger's front of the coach, not inside. Mark
On some of the coaches, this fan will only run when the motor is running since the power comes directly from the alternator. Gene
*******************
from
Emery Stora
The fan on my dash air doesn't work in the high position, it's OK in all others - any suggestions ? 77 Birchaven- dave
Its probably the high speed blower relay or a burnt wire or loose
connector to that relay. Your 77 model also has a delay
relay. It could be that. The information below should help
you to determine and fix the problem:
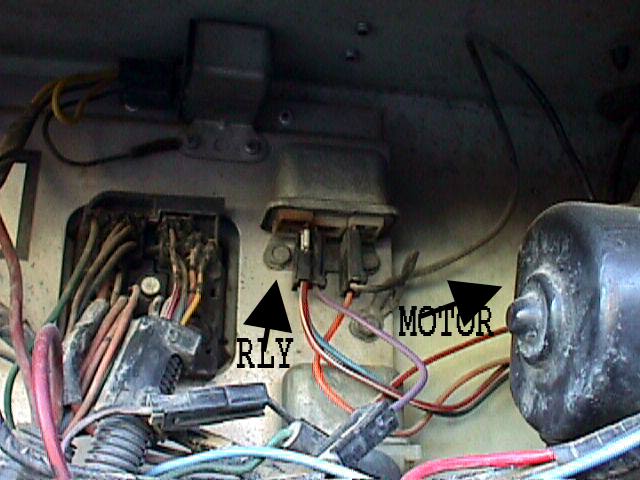
I have checked over my delay relay and the blower relay and this is
what I find.
The delay relay is the smaller relay at the very top of the panel. It
has two leads - on mine they are brown and yellow and one has a male
and the other
a female terminal at the end of the leads. The leads are approx.
6
to 8 inches long. The female one connects to the male terminal on
the
lead to the blower motor. The male one leads to the short lead
(purple
on mine) that goes to the blower relay (terminal 1). If the delay
relay
burns out you can plug the male motor lead directly into the short
female
lead going to terminal 1 on the blower relay.
The blower relay (below the delay relay but above the horn relay) has 5
terminals. When the blower relay is mounted with the 5 terminals
down,
there are two on the left, one in the middle and two on the right.
On the back left side it is #3 which has a red/white wire that leads to
a fusible link and that goes into the harness and connects to the red
wire from the alternator to the center stud of the battery isolater.
On the front left is terminal #2. Mine has a dark blue wire that
leads to the resistor package in the right side of the heater box.
In the center is terminal #1. Mine has a short purple wire with a
female connector. The male lead from the delay relay plugs into
this
(on mine right now I have the blower motor plugged into this as my
delay
relay is bad and disconnected).
On the right rear is terminal #5. This has a short black lead
that goes to a ground screw.
On the right front is terminal #4. This has an orange wire that
leads to the heater controls on the dash.
Terminals 4 & 5 control the coil in the blower relay.
Terminals 1 & 2 are normally closed and operate the blower when in
low or medium speeds.
Terminal 1 & 3 are normally open but when the dash
switch is put in "high" or "max" it actuates the coil and the relay
connects these terminals which give power to the blower directly from
the alternator in order
to get higher voltage and higher blower speed. At the same time it
disconnects
terminal 2 from the circuit.
Also this
At 1:16 PM -0600 6/16/04, Emery Stora wrote:
Hi Skip - the following should give you enough info to check out the
blower relay and the wiring. The "fuse" is a fusible link that
goes in the wiring from the center of the battery isolator. There
could also be bad connections with the terminals on the resistor pack
that is located on the driver's side of the heater box.
(see above quoted message)
You can use a voltmeter at the various terminals to check to see if it
is functioning properly.
If the delay relay is bad your high blower setting will not work. The
delay relay is the smaller relay at the very top of the panel. It has
two leads - on mine they are brown and yellow and one has a male and
the other a female terminal at the end of the leads. The leads
are approx. 6 to 8 inches long. The female one connects to the
male terminal on the lead to the blower motor. The male one leads
to the short lead (purple on mine) that goes to the blower relay
(terminal 1). If the delay relay burns out you can plug the male
motor lead directly into the short female lead going
to terminal 1 on the blower relay.
And maybe this:
At 7:23 PM -0600 7/21/03, Emery Stora wrote:
It just occurred to me that an easy substitute is to use a Bosch
5 terminal relay. These are very, very common and found at about
any parts store. Just be sure to get a 30 or 40 amp capacity one
as they come in various amp ratings.
These relays have 5 terminals marked as follows:
85 and 86. This controls the coil. One side goes to ground
and the other to the switch on the dash blower control. These
terminals correspond to the original relays 4 & 5 terminals.
Terminal 30. This corresponds to the original #1. This has
the Purple wire that leads to the time delay relay or directly to the
blower motor
if the relay has been taken out of the circuit.
Terminal 87a. This is the normally closed terminal that
corresponds to terminal 2 on the original. It has a dark blue
wire connected to it.
Terminal 87 is the normally open terminal that corresponds to
terminal 3 on the original. A red/white wire goes to this
terminal and it leads to the alternator output.
These relays are commonly found and probably a lot less expensive than
whatever substitute is currently available for our original blower
relays and will do just as good a job if not better
Emery Stora--