Then save this web page as a .htm file that you can later access with your browser in an offline mode.
After having done leatherwork for a number of years, I became interested in binding all the old leathercraft magazines I had accumulated. Before I could ask my father about his methods, he passed away. I then did extensive research, reading as much as I could, but also visiting bookbinders who still practice their craft by hand.
Traditional bookbinders use their methods, developed over centuries, because it produces the desired product and because it has always been done that way. I wanted something simpler, producing a stronger volume that could open completely for easy photocopying and I did not want to follow methods that required all sorts of weird tools.
The method I developed and describe here, is completely my own and not traditional at all. It works best for binding magazines that consist of single (or multiple) signatures, i.e. the original magazine was produced by printing it on wide pages, folding them in half and stapling the pages together on the spine.
2. Place all the magazines in their proper sequence, i.e. Jan to Dec.
3. Take blank sheets of paper, double the size of the magazine, and fold them in half to form blank magazines. One of these, consisting of two or three sheets of folded paper, is added in front, before the first magazine, and another is added to the back of the volume, after the last magazine. These serve to protect the magazines and as a place to paste in an index or table of contents of the articles. We will call these the blank signatures.
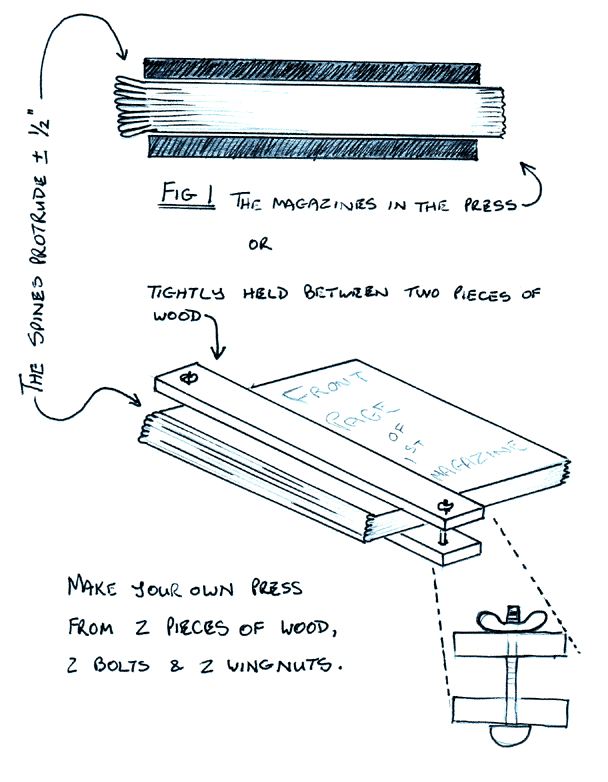
4. The magazines must now be immobilized or clamped in a bookbinding press. See Fig 1.
You can get away with just weighing down the magazines under heavy books, or you could use two long pieces of wood that you clamp over the magazines with pistol-grip clamps you can buy in any hardware store. Or the two pieces of wood can be firmly tightened with long brass bolts and wing nuts.
All sides must be precisely squared up, as the magazines will now be fixed in their final positions within the volume.
Be careful not to tighten the clamps or book press too much. As long as the Magazines cannot slide around, you have enough pressure on them. I have made the mistake of putting so much pressure on Photostatted (Xeroxed) newsletters that the print was transferred to the opposite page as well. With a book press it is not difficult to apply this much pressure.
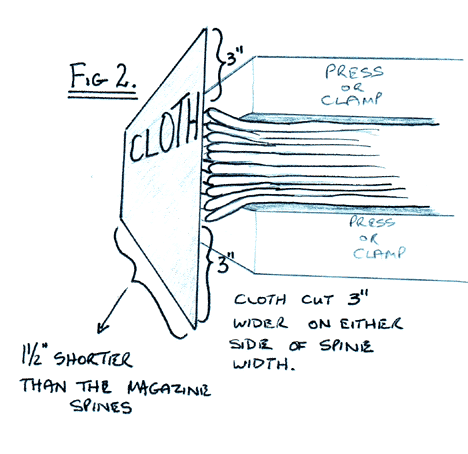
5. Measure the length of the spines of the magazines and cut a piece of cloth 1½ shorter than this. It must be wide enough to cover all the spines of all the magazines plus 3 to the front and back of the volume. See Fig 2.
I prefer to use unbleached linen, but you can also
use the cloth from an old retired denim shirt - any cloth that will not
stretch. The photograph next to the thumbnail for Fig 2, shows both the
linen I use and the thread next to a dime, so that you can see the thickness
of the thread. (For those of you outside the USA, a dime has a diameter
of 17mm.)
 |
|
6. Put glue on the spines of the magazines. Cold white wood glue / project glue is fine and I believe Leather Weld should work very well. Quickly put the piece of cloth over the spines and make sure that it is glued to every magazine and to the blank signature that is in front and back of the volume. Leave it to dry, preferably overnight.
This temporarily holds the magazines / signatures together while you stitch them to the cloth, but it does also serve to strengthen the final volume and give the spine a bit of rigidity.
7. When you take the volume out of the press, you will have all the signatures (magazines) glued to the cloth, with three inches of cloth lying on the top and at the bottom of the volume. Fig 3 shows a cut through view of the spine side of the volume.
![]()
1. All the holes for the stitching is done from the inside of each individual magazine - from the exact center spread, so that all the pages will be held by the stitches. Never open up a magazine completely. Keep it as shown in Fig 4.
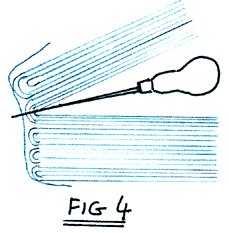
Each hole that is made, is immediately used, in other words you do not make a whole row of holes and then attempt to find them all again to put the needle through.
2. Fig 4 also shows how stitching is begun with the second signature, i.e. the first magazine after the blank signature. See also Fig 5 where the blank signature is invisible and only the first magazine is shown.
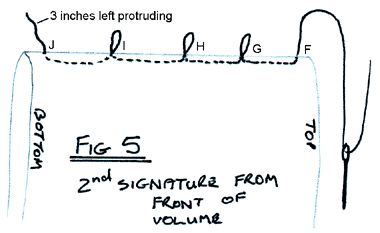
3. In Fig 5 the thread is shown to go in and out of five holes. These correspond with the five holes shown in Fig 8 as J, I, H, G and F, from magazine bottom to magazine top.
![]()
4. The first hole made, is # J. the thread is taken from the outside into the middle of the magazine and about 3 - 4 is left to protrude on the outside.
5. The thread is taken out at hole # I, looped around a Chinese Chopstick (not shown), and taken through the same hole back to the middle of the magazine again. The same looping is done at holes # H and # G.
6. At hole # F the thread is taken just to the outside. Open the first signature (the blank signature) in the middle, taking care not to shift the folded blank pages. Remember these will not have a staple through and can therefor move around.
7. Hole number E is now made in the first signature and the thread brought to the middle of the signature through that.
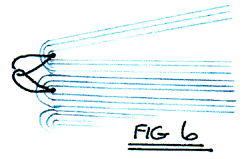
8. The thread is taken along the inside of the first signature to hole # D where it is taken to the outside, looped through the loop left there previously, dangling from hole # G and taken back through hole # D to the middle of the blank signature. The thread looping out of holes #D and # G will now give the cross section shown by Fig 6.
9. Carefully pull on the thread now in the middle of the signature as well as on the loop coming from hole # H, so that the two loops have no slack on the outside and meet in the middle of the two holes as shown in the detail of Fig 7.
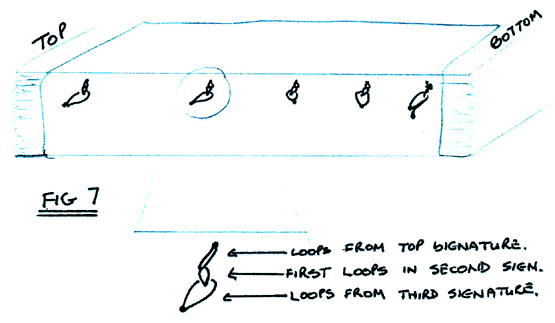
Take care not to pull the loop from hole # H in such a way as to pull the loop out of hole # I.
10. It is not necessary ever to have these holes in the same position in all the signatures. I prefer to have them a bit away from each other on purpose. When they are too close to each other, the thread tends to bite into the paper. So, if hole # E is 2 from the top of the magazines, hole # F can be 2.5 and hole # O can be 1.75 or close to that.
11. The same procedure done with holes # D and # G is repeated at holes # C and # H as well as at # B and # I.
12. When the thread comes out of hole # J, a knot is tied with the 3 of thread left there in the beginning.
13. The thread is then taken into the middle of the third signature (the second magazine) through hole # K.
14. The thread is taken to the outside through hole # L, looped around the threads from holes # B and # I and is taken back inside through hole # L. This basic step is now repeated until all the signatures have been sewn.
15. When the thread comes out of the very last hole, it is tied to the other threads on the outside and cut off, about 4 from the knot.
16. The whole spine of the newly sewn volume is given a thin layer of glue, the Leather Weld type, and left to dry.
With the signatures now securely sewn together, the volume can now be set aside - it is quite sturdy and can even survive a trans-Atlantic crossing. If you are going to make a leather cover for it, this can be done at leisure.
2. Between the first blank signature and the 3 of cloth lying on top, I glue in a folded piece of decorated paper, using normal paper glue. This paper was traditionally marbled, but can be plain colored or white. It is glued to both the cloth and the first blank signature page. The inside of this folded decorated paper will be what you see when you open the outer cover of the finished volume.
3. Optionally, on top of this decorated paper (on the outside), you can also include a stiffener. The always useful X-ray plates is one suggestion - any material goes, depending on how sturdy you want the volume to be. I like at least a thick cardboard. This is glued in under the cloth so that it is sandwiched between the cloth and the decorated paper.
4. To summarize: You will now have all the signatures in the middle, with a decorated page folded double on either side of the signatures. On the outside of these you will have an optional stiffener and folding over all of these, will be the cloth to which the magazines were sewn.
See Fig 9.
![]()
5. Cut an decorate the outside leather cover as you would to cover a paperback book. I prefer to cut this cover in three pieces - Front, back, and the spine. That way you can utilize the original leather size better (you need a smaller original piece of leather to cut the three smaller pieces from). They can be sewn or laced together. As long as you end up with one single leather cover that can be glued to the volume.
6. Glue is applied to the whole outside of the volume, except the spine where the signatures were sewn to the cloth. This will never be glued to the leather cover - there will always be a gap along the spine of the volume between the cloth and the leather, allowing the volume to be opened up completely.
7. Weigh the volume down with other books or place it in a press again, being careful not to spoil the leather, and let the glue set and dry completely.
You should also be able to open up the volume at a chosen page and put it face down on a xerox machine - completely flat. Of course, this depends also on the original binding method of the magazines.
Please contact me: Johan Potgieter at e-mail: jnpjohan@bigfoot.com
Back to my LeatherCraftPage
Back to my HomePage