BODY
[DOOR LATCH] [Tail lights]
[Low Spot]
[WIPER BLADES] [WINDOW SEALANT]
[REAR CAMERA]
[ACCESS DOOR LIFT] [SCREENS] [Clearance Lights]
[ISOLATION PADS] [leak check]
WIRELESS REAR VIEW CAMERA
(12/12/06)
So I got the $100 wireless camera from Walmart.
Since it was "wireless" I wanted to keep the camera line-of-sight
to the monitor/receiver on the dash. Also did not want it
to transmit through any solid materials, so I did a glass Mount on the
rear window. The mount is at the top of the rear window and I
cannot see the camera from inside of the coach.
http://www.gmcmhphotos.com/photos/showgallery.php?cat=4653
I did not want the camera to draw power all of the time so I
hooked it to the running lights. That way I can turn the camera
on and off when ever I want.
I was also not sure this was going to work well (looks like it does
though) so I did not want to drill any holes in the GMC.
I want the camera to watch the Toad, and the trailer hitch / rear
of the coach. I had to point the camera down at 45 degrees to get
the image correct.
Easy job, less than an hour for the install.Gene
ELECTRIC
ACCESS DOOR LIFT (4/24/05)
The access door for the Electrical connections on the GMC are
always falling closed. Here is a $5 solution to the problem
http://www.gmcmhphotos.com/photos/showgallery.php?cat=3506
Here is a video that shows how it works. This video takes a
long time to load, so wait for the video to appear. Internet
Explorer is the only browser the currently will show the video.
https://www.youtube.com/watch?v=oN7OmrgCTJY
WINDOW REPLACEMENT MOUNTING SEALANT
Several of our local GMC Club members have been using a "D" Section
seal/Gasket
that makes the job very easy & the windows can be removed/moved
around
w/o any mess. The Sealant is made of EDPM Foam & has a long
life
duration. The flat part (1/2" wide) of the "D" has an adhesive
for
locating onto the window frame. By placing it slightly inside the
frame
edge, it will compress upon installation & give you a nice finished
edge.
The "D" material will compress to about 0.050" thick as the frame is
clamped
into place. The sealant material can be purchased at following:
Clean Seal Inc.
South Bend, IN
800-366-3682
P/N 108H2-100
(100
ft roll)
www.cleanseal.com
Cost is about $0.25 per ft.
Normal Minimum order is $50
(200
ft)
this is no longer .25 cents a foot. sold in 25 foot increments only
at $3.25/foot! so 100 feet will be $325 bucks! Adam
A 100 ft roll will completely do all windows in coach with some left
over.
So for $50 one can do two coaches plus left over. Well worth the
cost
& simple to install w/o the mess of an adhesive paste.
This is the sealant between the side window frames (all side
windows) &
the coach body. Remove side window frames, remove the old
sealant, clean
window frame & body, install the flat side of the sealant (self
adhesive)
and then mount window frame back onto coach. No messy glue
sealant
to fuss with & a nice clean finish line between window frame &
coach.DUANE
WIPER BLADES
Wiper blade assembly is Trico # 64-200 (silver) or #64-201 (black) The
refill
only is Trico # 72-200 if you have a Trico blade. I believe Trico was
the
OEM blade. If you have an Anco blade the refill is Trico# 70-200. The
little
nozzle for the washers are replaced with Anco# 48-03 that comes with
the
little screw and nut as well as the hose. All of the above are one per
package,
not a pair. All of the above likely have to be ordered by your parts
house
Anco (5/8" wide) Windshield Wiper Blade Assembly, Silver Not
the
Arm.-------52-20 (Includes spacers and bolts)
Anco (5/8" wide) Windshield Wiper Blade Assembly, Black Not
the
Arm.-------57-10 (Includes spacers and bolts)
Anco (5/8" wide) Windshield Wiper Blade Refill,-------53-20
Anco (1/2" wide) Windshield Wiper Blade Refill,-------58-50
Trico (1/2" wide) Windshield Wiper Blade Refill,------72-200
Napa (1/2" wide) Windshield Wiper Blade Refill,-------60-2008
Anco Squirters (includes the hose and bolts.)---------48-03
Gary W. Mills (Livonia MI)
. ___________
The little nozzle for the washers are replaced with Anco# 48-03 that
comes
with the little screw and nut
as well as the hose. All of the above are one per package, not a pair.
Also,
wiper blade assembly is
Trico # 64-200 (silver) or #64-201 (black) The refill only is Trico #
72-200
if you have a Trico blade. I
believe Trico was the OEM blade. If you have an Anco blade the refill
is
Trico# 70-200. All of the
above likely have to be ordered by your parts house.
Denny Allen (10-22-01)
--------------
COCKPIT WINDOW SCREENS
As a GMC owner since 1990, I found a flaw in the otherwise almost
perfect touring motorhome. That flaw was lack of air in the
cockpit unless the
dash A/C was running. As soon as the motor was shut off, so
was
the air. The small cockpit windows were opened and every bug in
the
area came in for a snack
of my type O blood. Further, our two little Schnauzers
found
the easy access to the open windows, via the seats, irresistible.
In 1995, I developed the Sliding Cockpit Window Screens to function
just
as the window does. They are always in place ready for use.
Just
open the window and close the screen. They fit inside the
window
and look like they were meant to be there. The GMC has the lower
track
built in, so this kit includes
a new upper track to hold the top of the screen against the window
frame.
The screen are contoured like the window and have a rubber seal at both
ends
to keep the critters from crawling around them. Installation is very
easy
and requires no special tools or mechanical ability. So far there are
about
300 sets of my screens in use all over the US & Canada.
The screen frames are bronze aluminum, with black screen fabric and
the
track is brown/black vinyl to match the interior window frame.
Each
set includes two left & right screens and tracks with
instructions. The fit all stock GMC Cockpit windows, both
23 & 26 foot models. The add to the benefit of
“wind wings” by keeping the 70 MPH bugs outside
The Sliding Cockpit Window Screen Set cost $64.00.
Shipping via priority mail is $6.00
Send check for $70.00
Florida people add $3.84 for sales tax
Mail to PAUL DOBBIN
221
44th
Ave. NE
St.
Petersburg,
FL 33703
I’ll ship to the address on your check unless you request another
address Thanks for your interest. Paul
Side Rail Low Spot
There is a low spot in the front frame rails that will not let water
drain
out. This low area is where the large front cross member is attached to
the
side frame members. Take a side view look at the side rails in this
area
and you will see the low spot in the side frame.
The side rails are open in the front and will let rain water &
wash water enter and collect in this low area of the side rail. The
frame will rust from the inside. The right side rail will always seems
to be the worse. The engine heat would seem to keep these dry during
operation.They must rust
from rainfall entering the open front of the frame during extended
periods
of outside storage or when the coach is washed and put away for inside
storage.
I removed the grille and the fiberglass piece below it to get access
to
the,open front of the frame to clean the rust out and then prime and
paint
it. I,used a flex shaft on a drill with several types of heads to do
the
cleaning,& prime/paint. The rear of the front frame section is open
where
it bolts to,the main frame, so you can use shop air on an extension
from
the front to,blow the rust & debris out of the frame section.
To get this area to drain, I drilled a 3/8" hole in the bottom of
the frame
section, in the area where the front stabilizer bar comes across. Drill
the
hole in the outer half of the "C" section as that is the lowest part of
the
two piece frame section.
This has become the standard upgrade and here are the three ways to
do
it.
buy them from the Peek Family
http://www.bdub.net/updater/index.html
Cut the body
To see how I did it. Drag your mouse over the pics for instructions. I
have
had no leaks and the lights are very bright since they are not
dissected. Easy as pie if you have a Rotozip (Harbor Freight has them
on sale). Very happy with the outcome. HTH Nate '75GB (lurking
in) Omaha
http://www.tconl.com/~chase/gmc_lites.htm
http://www.gmcmhphotos.com/photos/showgallery.php?cat=3673
Cut the lights
http://www.henry-davis.com/GMC/Taillights.htm
http://www.gmcmhphotos.com/photos/showgallery.php?cat=3678
-----------
Front
Access
Cover Supports
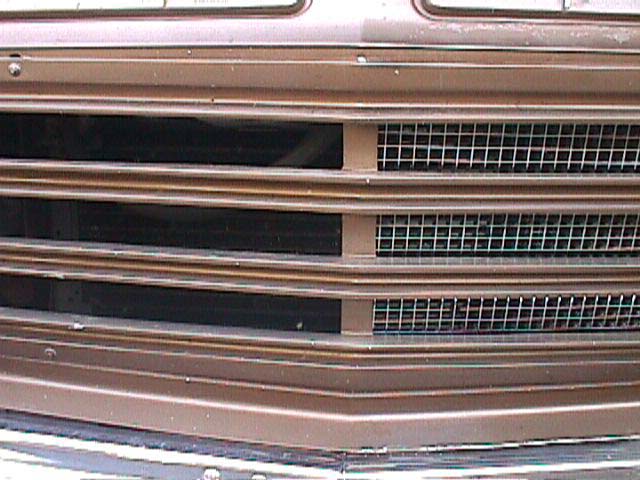
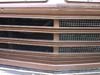
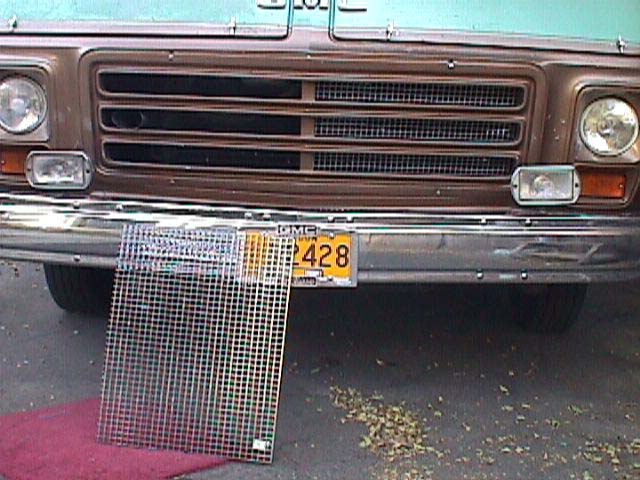
Grill Inserts
 I have been looking for an insert
to put
behind the grill of the GMC. I did not want to restrict the air
flow,
but I did want to hide the wires, hoses and radiator. I have been
looking
for a honeycomb pattern like the Dodge trucks, but was not able to find
a
suitable material. I have decided to use the plastic egg crate
panels
with 1/2 inch squares, used for florescent light fixtures.
I
wanted black but could not find that so I used the Chrome. Chrome
is
black in the shade so guess it is close enough. One panel does
the
trick, it cost $20 and was easy to attach using the same bolts
that
hold on the Grill. I sort of like the looks of it and it does
hide
the insides. gene
I have been looking for an insert
to put
behind the grill of the GMC. I did not want to restrict the air
flow,
but I did want to hide the wires, hoses and radiator. I have been
looking
for a honeycomb pattern like the Dodge trucks, but was not able to find
a
suitable material. I have decided to use the plastic egg crate
panels
with 1/2 inch squares, used for florescent light fixtures.
I
wanted black but could not find that so I used the Chrome. Chrome
is
black in the shade so guess it is close enough. One panel does
the
trick, it cost $20 and was easy to attach using the same bolts
that
hold on the Grill. I sort of like the looks of it and it does
hide
the insides. gene
REAR FENDER FLARES
These flares were designed and made by Claude Brousson ,along with
some suggestions from one of the original G.M design artists. They were
made with
two purposes in mind--to add to the beautiful lines and symmetry of
this
classic vehicle and to make the rear wheel area more accessible for
inspection
and serviceing,for example keeping the rear boggies well greased. Small
plastic
covers are supplied to keep the grease nipples clean and covered. The
original
8.75x16.5 and more recent 225x16 tires fit very nicely and with ample
clearance
in the lower corners. There is reduced clearance with the larger
diameter
9.50 tires. Cost is $275.00 US. Contact Claude Brousson,Phone
250-652-4913
or cbrousson@telus.net
 I think we are all
trying
to get back to this classic line of the original foot clay model.
gene
I think we are all
trying
to get back to this classic line of the original foot clay model.
gene
Here are
the
pictures of Claud's flares Click here for details

Isolation pads
The pads are very important. They provide isolation from the
frame
for noise, cushion and space for some tubes. It is a good idea to
replace
them but for sure it is a good idea to put them back into
position. The recommendation is to use a flat pad between a
jack and the bottom of the coach and jack the coach away from the frame
just a little. This
should let you slide the pads back into position. Some folks have
stuck
them in place with something like silicon goop or weather strip
adhesive.
The pads are sold by Cinnbabar Eng. and Curtis's
http://www.bdub.net/curtis-unlimited/index.html
Other pads have been recommended
such
as , raw recap rubber, and cut down truck mud flaps.
Here is a picture of where the pads are located
http://www.gmcmhphotos.com/photos/showphoto.php?photo=14837
Here is a step by step procedure
http://www.bdub.net/Isolation_Pad_Replacement.pdf
by John Shotwell
How can you tell if they need
replacing?
First check to see if they are still there. The 73 and perhaps the 74
models used a long strip which usually stays in place. Later models
used the shorter pads and many GMCs are missing them and the body is
sitting directly on the frame in many places.
Do your cabinets rattle? Can you feel road bumps? Is your interior more
noisy than some other GMCs that you have ridden in?
In my case, more than half of them were missing. After installing new
ones I found all of the above improved. In addition, my fuel tank
filled up easier. A line must have been pinched where it goes between
the frame and body.
My air cleaner also had more clearance under the motor box cover.
A hint when replacing them --- put a short piece of 2x4 just behind the
frame against the floor and jack it up a little. This should give you
clearance to slide in the pad. Put some "Liquid Nails" from a tube onto
the pad where it meets the frame and it will help keep it in place. It
also acts as a lubricant to make it easier to slide in the pad. In a
couple of cases I used a small ball peen hammer and a block of wood to
hit against the side of the pad to get it to slide into place. Also
drive a sheetrock screw up through the pad into the floor. This will
also help to keep the pad from slipping and moving out of position in
the future.
do you have to drop any tanks to do
this?
No, the frame rails are outside of the tank area. You can do this while
lying or squating alongside the motorhome.
Loosen the Ragusa Step
JimK is totally correct. You must remove two of the bolts that
hold the step or when you jack up the body you will crack the two
attaching legs of the step that bolt to the frame.
Do you have to loosen the body mount
bolts?
I did loosen one of the front mounts but when I attempted to loosen
another one the carraige bolt just turned in the floor. So, I tried to
jack things up with the 2x4 against the floor and it gave enough
clearance to slide in the new mount. So I did the other side without
even trying to loosen the mounts. I did not attempt to replace the
little pads below the four mount plates and I dont' think that was
necessary anyway. They don't come with the kits anyway. EmeryC
Water Leaks
SILICONE SEALERS
Although hardware store "clear silicone" is commonly used for RV leak
repair
there are a couple of things wrong with use of this material for leak
repairs
on our GMC's.With the exception of very small localized application for
temporary
repairs, I rarely use clear caulking since it never stays clear. During
application
clear silicone gives the impression that it will remain invisible
inviting
a spread of caulking beyond where it will do any good.Since silicone is
so
good at picking up dust and dirt it immediately starts to change color
to
match the soil color of the countryside it resides in making it much
more
obvious than it began (unless of course the appropriate color match was
dirt).
Choosing the best solid color caulking helps maintain self control
during
the tooling of the caulking, increases the likelyhood of masking to
prevent
the spread of the uglyness and increases the likelyhood of cleanup
prior
to serious cure.
Further since the formulas used to create silicones are so variable
one
should be careful and pick the appropriate formula for the job. As one
example,
one thing I never do is to use an acid cure (vinegar smell) caulking
anywhere
near steel. The acid cure silicones can be identified by the warning on
the
tube of the strong smell during cure. When used on steel acid cure
silicones
promote rust. While I recognize that the upper cab window and window
area
is primarily aluminum and fibreglass there are fasteners in that area
that
may in some cases be some sort of coated steel.
Another example is the use of silicone to seal between the
windshield gaskets
and the body. If the leak is caused for example by water coming
in
through the cavity between the windshield gasket and the body silicone
might
stop the water entry by filling the gap. In this case a black
neutral
cure silicone may be O.K. If properly applied and tooled. If properly
tooled
with a soapy water solution (palmolive is good) dirt imbedment during
cure
can be reduced. Since silicone and the EPDM that the gaskets are made
of
are incompatible the silicone will never stick to the gasket but it
will
sure stick good to the body so best get it off the paint before it
cures
too completely.
I will never forget the months it took me to clean and replace the
clear silicone the previous owner used on my old SOB, but it sure
looked/worked better once the fix was complete. Gary Zingle
In Dry Weather
One method is to pressurize the coach with a very low pressure
fan,
wash the outside of the coach down with high sudsing detergent and
watch
where the leaks blow bubbles. Use a washing brush to investigate every
seam.
Air will blow bubbles even where water will seep in. This is the same
technique
in finding an air leak in an inner tube. It doesn't take much air
pressure
to blow a soap bubble.
Leak
Check Seminar Pictures
More
pictures by Kelvin on how to connect a blower(2/2/6)
High volume low pressure fans are used to pressurize balloon
buildings, toys and advertising. The pressure is low enough that
you can walk in
and out of the "blown up building" without really feeling the pressure
change.
Check the safety dump valve to make sure that pressure cannot be built
up
inside and blow something out. chuck
I got the same results by running the roof air (or fans that draw
air in)
that produced enough inside air pressure to cause soap bubbles on the
roof
and around the windows. Im sure if I replaced the worn felt in
the
window track. Rob
DS
Clearance lamp mounting pads are now available. They are
die
cut black foam like the originals. Price is $2 each including
shipping.
If interested please contact me directly - not on the list.
carguy@clover.net
. Price is $2.00 US each including shipping to any point in
USA or
Canada. Please mail your check to:
Bill Brown
741 Sheridan Rd.
Coshocton, OH 43812-2771
Replacement Clearance Lights
I just changed my clearance lights to LED lights from Maxxima. Love the
new look. I had to move the wire holes forward to fit the bottom of the
lights. I sealed the old holes with epoxy steel, the dough kind you
knead, and it worked very well. I had some very bad screws as well, but
a
sharp pair of diagonal wire cutters were able to grab the top and get
the screws out. I used new 6-32-1" screws to set them. I had to replace
some
rivet nuts to seal them down, but I have a kit fir that (Harbor
Freight) and it worked great. They look wonderful and I am so glad I
did! Each
light, about $10. Bob Noble
http://www.buytruckstuff.com/product.asp?selcategory=34&p_gpID=132
The LED lights are Maxxima M20311R for red and M20311Y for amber.
Here are some pictures by Scott that show the problems with the old
lights. He no longer sells the LED lights but the links above
work.
http://www.gmcmhphotos.com/photos/showphoto.php?photo=7221&ppuser=229
Doing your own Fiberglass Repairs
Arch
Fiberglass work is not hard to do. I will tell you how I do it and
you may
do as you please. First I try to keep all of my work on the back side
of
the finish. This way glops and gobs don't show. If you have some places
where material is gone then first place a piece of polyethylene (most
common drop cloths) over the area. Then back it up with something
with a little stiffness. If the area is small cardboard is fine. Larger
areas
use 1/4 inch plywood. Make sure there are no wrinkles in the poly. The
fiberglass does not stick to the poly and it will leave you with a very
smooth
surface. If the damage is in an area with some contour to it get some
modeling clay and go to the other side of the vehicle and make a mold
and do what ever you have to do to make it right for the other side.
Mount
that on your backer board and cover with poly. I usually use duct tape
to hold all of this in place. Make sure it can't move around on you.
Now this is a quirk of mine and I will state that. If you have long
cracks
in the fiberglass body go to the end of the crack move in the line of
the
crack out about another 1/2 and drill a 1/2 inch hole. This will
disperse
the forces around the hole instead of in a straight line. I said to
move
out 1/2 inch because the fibers are probably damage farther out than
you can see.
Go buy a fiberglass kit that fits your needs. You will want to buy
at least
twice as much glass cloth as you need because you will want to put
down two layers. Next I like to rough up the area where I am going to
glass over. Put a wire brush in a drill and rough it all up a little go
at
least
2 inches beyond any cracks and what ever. There are probably lots of
thinners you can use to clean the area. Acetone is often recommended.
For all of use who can get it in the hardware store--good. Some areas
wont let them carry it. Go to the cosmetic area and buy cheap nail
polish remover----same thing. Now if it looks like there has ever been
any silly-cone in the area. Go to your local body shop supplier and get
some "Final Prep" of something like that. Its a real strong solvent.
About
$10-$20 dollars a gallon----but good stuff.
Now cut some of the cloth to fit the areas you need to patch. Make
pieces to fit all of the broken areas. Then cut a piece that will cover
all of the damaged area. On the small areas lay the glass on with the
fibers laying not vertical and horizontal but /////\\\\\\ Then on the
big
piece let them run vertical and horizontal-----||||||. I sure hope you
understand that----if not holler----I will try again. Mix up the resin
by
what the can says. Here are a few tricks. Take a small amount of resin
and add what would be more than enough hardener. It will change color.
You now know what color it should look like when you mix the real
thing.
If when you mix the real batch it does not turn that color add some
more
hardener. Another trick if you are going to do this on a hot day---you
may
have trouble with the resin going "off" before you want it to. The
whole
reaction is an exothermic one. Heat speeds it up. Put the resin and
hardener
in the reefer the night before. Got two containers to mix the resin in.
One
that is larger than the other. Fill the outside container with ice then
put
the inner container inside it and mix resin. If you line the container
with Poly you can reuse it. Put the glass cloth down in the resin. Work
it with your hands. Make sure it is all the same color. Work the resin
into the glass cloth. Place the cloth on the body. Work our ALL air
bubbles.
Best to start in the middle of the patch and work out toward the edges.
Fix all small areas and come back with the big piece. Let set up till
hard.
Then remove the material on the outside of the body. Fill in holes
with
Bondo and sand. Suggestions: Get some rubber gloves---some people
have a nasty reaction to resin. Get some sort of breathing filter even
a
cheap paper one is better than nothing. Wear some kind of goggles.
You do not know the meaning of pain until you get hot resin in your
eye.
Hope this helps.Arch
---------------------
A couple of glassing hints I have done are are:
1. Use as little resin as possible. The strength is in
the glass not the resin. Extra resin actually weakens the
patch. Use
only enough resin to fully saturate the glass.
2. Take some tongue depressors and cover them with gray duct
tape. Immediately after applying the glass and resin to the
crack, clamp the area
between the duct tape covered tongue depressors. (You can cut
them
to size if necessary after the duct tape is applied.)
A
couple a squeeze spring clams will hold the tongue depressors in
place. This will give you a very smooth, thin and stronger
patch. It also helps
to compress the glass into the resin. The resin will not stick to
the
duct tape and the tongue depressors can easily be removed later.
3. Remove the clamps after the patch is setup but not rock
hard. At this point you can still trim any excess glass and resin
with a pair of
scissors. High spots of excess resin can be easily be
ground off
with a Dremel tool at this time.
4. Resin cures by self-generating heat. If you have a problem
with
setup time or time to cure, gently heat the area with a heat lamp or
hair
dryer to accelerate curing time. Be careful not to overheat or
burn
anything.
After all the cracks were patched I did not need to sand
anything. I bought white vinyl paint used to paint vinyl seats
and painted the cap. This stuff is available at Home Depot ot
Menard's in spray cans. This vinyl paint is very flexible and does not
crack after drying.
You can not find the cracks anywhere in my front cap now. I
also glassed over some of the cap mounting holes and re-drilled new
ones after painting. Ken Burton
[INDEX] | [SUGGESTIONS]
 I have been looking for an insert
to put
behind the grill of the GMC. I did not want to restrict the air
flow,
but I did want to hide the wires, hoses and radiator. I have been
looking
for a honeycomb pattern like the Dodge trucks, but was not able to find
a
suitable material. I have decided to use the plastic egg crate
panels
with 1/2 inch squares, used for florescent light fixtures.
I
wanted black but could not find that so I used the Chrome. Chrome
is
black in the shade so guess it is close enough. One panel does
the
trick, it cost $20 and was easy to attach using the same bolts
that
hold on the Grill. I sort of like the looks of it and it does
hide
the insides. gene
I have been looking for an insert
to put
behind the grill of the GMC. I did not want to restrict the air
flow,
but I did want to hide the wires, hoses and radiator. I have been
looking
for a honeycomb pattern like the Dodge trucks, but was not able to find
a
suitable material. I have decided to use the plastic egg crate
panels
with 1/2 inch squares, used for florescent light fixtures.
I
wanted black but could not find that so I used the Chrome. Chrome
is
black in the shade so guess it is close enough. One panel does
the
trick, it cost $20 and was easy to attach using the same bolts
that
hold on the Grill. I sort of like the looks of it and it does
hide
the insides. gene