Installing the
Grand Classic Master Track System
Don Roberts
(734) 847-8515
jroberts@gte.net
Please note that the rear suspension of the coach should be in
good alignment before installing this system, if it is not wearing
the rear tires unevenly the rear wheels are probably in good
alignment. This system is not designed to correct bent bogies
or worn pins.
Any work done on your GMC Motor Home should be done in a safe
manner, use all safety precautions: safety glasses, good jacking
equipment, timbers or strong jack stands, common sense, the proper
tools, etc. The job requires about six hours and will go much
easier if there are two working at it. At least one who is mechanically
inclined and the other to hold and fetch.
After jacking the coach up and blocking it in a secure manner,
drop the air pressure in the air bags, and remove the leading
rear wheels; remove the brake drums as per instructions in the
GMC Motor Home Shop Manual; remove the four 3/8 inch bolts which
secure the drum backings and spindle to the leading bogie arm.
Using the longer grade 8 bolts supplied secure the Master Track
axle bracket to the inboard side of the bogie arms with the large
bolt hole down. (For coaches with disk brakes the axle bracket
is bolted on the inboard side of the backing plate.) The brakes
can now be reassembled with the brake drums properlv installed
to the axles. These procedures must be done on each side.
On the right (passenger's) side of the coach make a mark on the
frame 14 inches in back of the back edge of the frame cross member
between the gasoline tanks. On the left (driver's) side make
a mark on the frame 8 7/8 inches in back of that same cross member.
Clamp or use jacks to hold the Master Track cross member to the
bottom of the coach frame with the front edges of the Master
Track cross member mounting brackets on the lines you made on
the frame. Yes, that means that the Master Track cross member
will not be straight across.
The next steps will involve drilling and you are cautioned to
be certain that any wires or other essential parts of the motor
home are not going to be damaged. Also you are reminded that
drill chips are often sharp and hot so be careful. A suggestion
here is that a 2X4 about 6 feet long as a lever and a block of
wood for a fulcrum can be used to apply steady pressure to the
drill.
Once you have the Master Track cross member centered on the frame
and exactly on the lines on the frame (Check and recheck this)
drill a 13/32 hole straight up through the frame using one of
the mountng bracket holes as a guide. Install a bolt finger tight
to hold things in alignment. Do this on both sides and be sure
the holes are straight. Drill the other hole in each mounting
bracket.
Before mounting Master Track frame plates coat the top side with
grease, silicone, or roof cement to seal out moisture. Drop the
Master Track cross member on one side and fasten the frame plate
to the holes you have just made - finger tight only. All nuts
are to be on the top of the frame and use the lock washers provided.
Do the same on the other side. Straighten the frame plates on
the frame, tighten the two bolts on each side. Drill the remaining
four holes on each side of the frame, install the bolts and tighlen
securely.
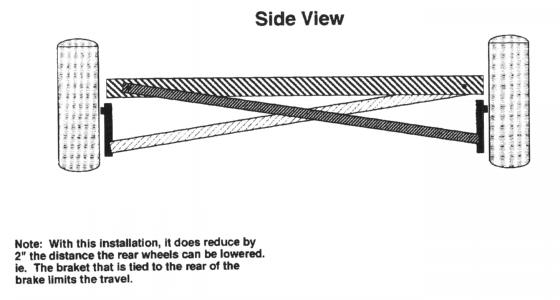
The right side Master Track Panard rod. - tracking bar or tie
rod, if you prefer - is secured to the axle bracket with a bolt
and rubber bushings and will eventually be fastened to the front
left side of the Master Track cross member by an adjustable fitting,
but not now. For now use wire and fasten the rod to the Master
Track cross member. Do the same for the left side. (The left
side bar will be secured to the rear of the Master Track cross
member.)
Reinstall the leading rear wheels, torque the nuts, and re-inflate
the air bags. Drive to a level place where you can let the motorhome
coast or be gently braked to an easy stop and where you do not
have to turn for a couple of coach lengths. On each side in turn,
reach under the coach, unwire the Panard rod and run the adjustable
fitting in or out until the bolt will slip through its hole easily.
Install the lock washer and nut and tighten securely. Tighhten
the adjustable fitting jam nut also. Do the same on both sides.
This method should hold the rear wheels in good alignment - if
they were before.
Now enjoy easy driving with the trucks and cars in multi-lane
rush-hour traffic; or on rutted roads or anywhere
(c) November 1996, Don Roberts
 Graphics by Al Chernof

Both arms and bracket |

Arm to wheel connection |

Close up brace and bracket |

Opposite side |

Cross member and two arms |

Both arms and brace (Driver's side) |

Brace and two cross over arms |

Close-up brace and wheel |

Crossover and brace |

Connection to Bogie |
|