CONTENTS
Special tee fitting
Jabsco Macerator Pump
1 1/2" suction hose and clamps
10' of 1" discharge hose and clamp
Pump bracket and hardware
3" slide valve, flange fitting and handle extension
ABS glue
Wiring, including fuse, fuse holder and switch
Installation instructions
This kit is made to fit the GMC
Motorhomes with the side wet bath. The coach must have the single
holding tank located directly behind the rear gas tank. The original
slide valve is located directly on the rear center of the tank.
There is a extension to operate this valve from behind the left
rear tandem wheel. This kit can likely be adapted to other floor
plans but the instructions would merely be a guide.
Installation requires cutting the 3" pipe to the rear of
the original slide valve. The special tee is glued on here and
your original 3" dump system reinstalled on the special tee/
slide valve assembly. The pump is mounted on the frame to the
left of the special tee. It is about 1 1/2" total below the
frame. The only time you would hit the pump is when you are backing
up over a curb or similar obstacle. The 1" discharge is always
connected to the pump. It remains coiled in the left rear compartment,
usually between the generator and the house battery. The on/off
switch is also located inside this compartment.
Contact Denny Allen passed away in 2008. A similar kit is available from Jim Kanomata at www.appliedgmc.com.
Prices
May, 2001 U S Funds (includes shipping)
Complete Kit $300
Kit less pump $200
Special tee only $45
Pump Bracket only $40
Longer discharge hose $1.50/ ft
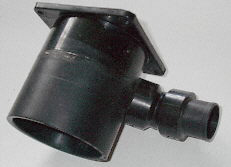
This is the special tee fitting I fabricate for my macerator pump installation kit.This part is glued onto the existing piping behind the existing 3" valve. The flange goes toward to rear of the coach and a second 3" slide valve is attached to it. This valve is always kept closed except when dumping via the old 3" hose. The macerator pump suction comes off the bottom of the 3" piping and the elbow turns to horizontal so it can lower the level in the holding tank better than any eccentric reducer.
The first step in the installation is to cut off the existing piping 3" behind the frame crossmember. The existing piping is shortened and put back the same as it was.
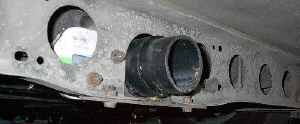
The special tee fitting is glued onto the 3" pipe as shown. This photo shows how the macerator suction line comes of the bottom of the 3" inch pipe. A second 3" slide valve is bolted to the flange to keep the old 3" dump system (that is retained) isolated and dry when dumping via the macerator pump. This second valve is only opened when you want to dump via the old 3" hose.
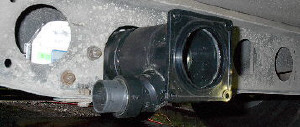
This shows the second valve installed
and an extension handle going to the right side of the coach.
This extension handle could go to the left but remember the Onan
is there too. This valve is only open when dumping via the old
3" hose.
This also show how the pump sits below the frame of the coach.
You could damage the pump if you back up over a curb or something,
not likely you would hit it going forward. The pump support bracket
is fastened to the frame through the existing large holes.
The macerator pump discharge hose and old existing 3" piping
has not been installed in this photo.
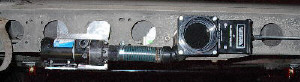
The 1" discharge hose is fastened to the pump and is routed
up through the coach floor into the Onan/battery compartment and
coiled for storage. Most coaches have a space between the Onan
and the battery area front wall that is used to store this hose.
The wiring from the pump is also routed into the battery compartment,
where the on-off switch and fuse is located. The system usually
uses the house battery for power.
Richard Waters recently installed this system. Click HERE for his pictorial of an actual customer installation.